
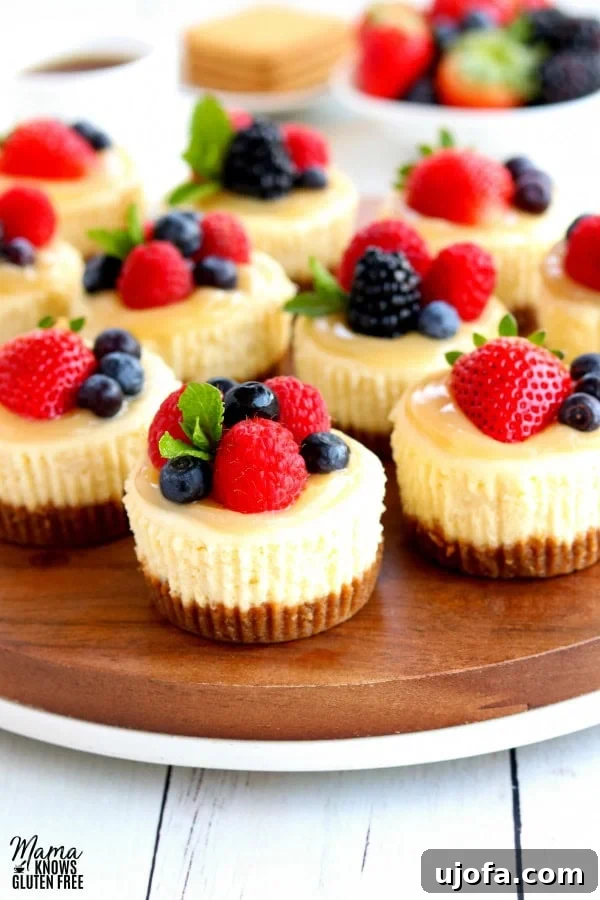
When you crave an elegant yet effortless dessert that always leaves a lasting impression, these gluten-free mini cheesecakes are an absolute go-to. They deliver all the rich, creamy decadence of a classic cheesecake, perfectly nestled atop a delightful graham cracker crust, but in a charmingly petite, individual serving size. This makes them incredibly convenient for parties, family gatherings, or whenever you desire a perfectly portioned sweet treat without the hassle of slicing a full-sized dessert.
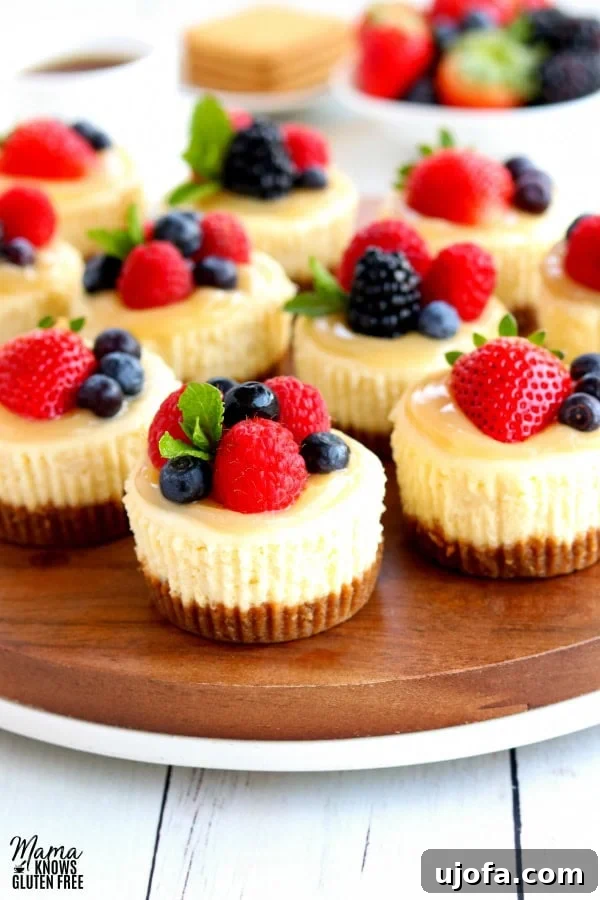
“Perfect every time and so easy to make for the person who comes to dinner and wants dessert too!”
– Julie
My passion for baking gluten-free cheesecake runs deep, but I’ve found that preparing them in muffin tins simplifies the process immensely, making it far less intimidating than handling a large, traditional version. This innovative approach allows you to achieve that signature smooth, creamy cheesecake filling and a perfectly crisp gluten-free graham cracker crust in about half the time. Say goodbye to the need for a springform pan or the complexities of a water bath; these little delights come together with remarkable ease.
Beyond their simplicity, these gluten-free mini cheesecakes are the ultimate handheld dessert for any celebration. Imagine a holiday party or a casual get-together where each guest can effortlessly pick up their own individual cheesecake. No more awkward slicing, no more serving dilemmas—just pure, unadulterated enjoyment. They offer all the luxurious taste of a classic cheesecake in a perfectly portioned bite, ensuring everyone gets a delectable treat without any fuss.
Why Mini Cheesecakes are a Game-Changer
There’s a special charm and practicality that mini cheesecakes bring to the dessert table, setting them apart from their larger counterparts. Opting for individual servings offers numerous advantages that streamline your baking process and enhance the overall dining experience for your guests.
- Effortless Portion Control: Each cheesecake is already perfectly portioned, eliminating the guesswork and potential mess of slicing a large cake. This is ideal for managing serving sizes and makes for a visually appealing presentation.
- Simplified Baking: Forget about specialty equipment like springform pans or the often-daunting water bath technique. Mini cheesecakes bake beautifully in standard muffin tins, making the process more accessible for bakers of all skill levels.
- Reduced Cracking Risk: One of the most common anxieties with traditional cheesecakes is surface cracking. The smaller size of mini cheesecakes naturally reduces the likelihood of cracks, yielding a consistently smooth, beautiful top.
- Versatility in Flavor: While this recipe is fantastic on its own, the individual nature of mini cheesecakes opens up a world of topping possibilities. You can easily offer a variety of toppings, allowing each guest to customize their dessert to their liking.
- Ideal for Gatherings: Whether it’s a formal dinner party, a casual BBQ, a birthday, or a holiday feast, mini cheesecakes are easy to transport and serve, making them a stress-free choice for any occasion.
- Faster Baking and Cooling: Smaller desserts generally bake and cool faster than a large cake, meaning you can enjoy your delicious creation sooner!
Essential Gluten-Free Baking Tips for Perfect Cheesecakes
Achieving a flawless gluten-free mini cheesecake requires attention to a few key details. These tips are designed to ensure your cheesecakes are smooth, creamy, and free from common baking woes:
- Ensure Room Temperature Ingredients: This is perhaps the most crucial tip for a velvety smooth cheesecake batter. Cream cheese, sour cream, and eggs should all be at room temperature. Cold ingredients don’t emulsify properly with others, leading to a lumpy batter. To quickly bring cold cream cheese or sour cream to room temperature, you can unwrap them and place them in a bowl of warm water for 10-15 minutes. For eggs, simply submerge them in warm (not hot) water for 5-10 minutes.
- Do Not Overmix the Batter: Once you add the eggs, mix the batter just until combined. Overmixing incorporates too much air, which can cause the cheesecake to puff up excessively in the oven and then collapse and crack as it cools. Beat on low speed and stop as soon as the mixture is smooth.
- Avoid Sudden Temperature Changes: Cheesecakes are sensitive to abrupt shifts in temperature. Resist the urge to open the oven door frequently during baking. Once baked, turn off the oven and let the cheesecakes cool inside with the door slightly ajar for about 10-15 minutes before transferring them to a wire rack. This gradual cooling helps prevent sinking and cracking.
- Proper Cooling is Key: After baking, cool the cheesecakes completely at room temperature before refrigerating. Rushing the cooling process can negatively impact the texture and increase the chance of cracks. Once cooled, cover them loosely and chill for at least 3 hours, or ideally overnight, to allow them to set fully and develop their rich flavor.
- Use High-Quality Gluten-Free Graham Crackers: The crust is a vital component. Choose a reliable brand of gluten-free graham crackers, such as Schär Honeygrams, or opt for homemade gluten-free graham crackers for the freshest taste. The quality of your crumbs will directly impact the texture and flavor of your crust.
Gluten-Free Mini Cheesecakes
Audrey Roberts
12 servings
10 mins
20 mins
3 hrs
30 mins (active)
Print Recipe
Gluten-Free Mini Cheesecakes are the perfect dessert bite! Everyone loves cheesecake, and these easy-to-make handheld bites are a rich cheesecake nestled on a buttery graham cracker crust. Ideal for any occasion!
Equipment
- 1 regular-sized (12-cup) muffin tin
Ingredients
For the Crust:
- 1¼ cup gluten-free graham cracker crumbs (One package of Schär Honeygrams is typically enough, or use homemade gluten-free graham crackers)
- 2 tbsp light brown sugar, packed
- 5 tbsp butter, melted
For the Cheesecake Filling:
- 16 oz. cream cheese (Two 8 oz packages), room temperature
- ½ cup sour cream, room temperature
- 2 large eggs, room temperature
- ½ cup granulated sugar
- 2 tsp pure vanilla extract
- 1 tsp lemon juice
Instructions
- Preheat your oven to 350°F (175°C). Line a standard 12-cup muffin pan with cupcake liners.
- Make the Crust: In a medium bowl, combine the gluten-free graham cracker crumbs, packed light brown sugar, and melted butter. Mix until the crumbs are thoroughly moistened and resemble wet sand.
- Press the Crust: Spoon about 1½ tablespoons of the crust mixture into the bottom of each prepared muffin liner. Press down firmly with the back of a spoon or a small glass to form an even, compact crust.
- Prepare the Filling: In a large mixing bowl, using an electric mixer on low-medium speed, beat the room-temperature cream cheese for 1-2 minutes until it is smooth and fluffy. Scrape down the sides of the bowl as needed.
- Add Wet Ingredients: Add the room-temperature sour cream to the cream cheese mixture and beat until just combined. Then, gradually add the room-temperature eggs, granulated sugar, pure vanilla extract, and lemon juice. Continue to beat on low speed until the mixture is smooth and lump-free. Be careful not to overmix after adding the eggs.
- Fill the Liners: Using a greased cookie scoop or a spoon, evenly divide the cheesecake filling among the prepared crusts, filling each muffin liner almost to the top.
- Bake the Cheesecakes: Bake for 20 minutes, or until the edges are just set and the centers have a slight jiggle. They may look puffy when they first come out of the oven, but they will settle as they cool.
- Cool and Chill: Allow the mini cheesecakes to cool completely at room temperature on a wire rack. Once fully cooled, cover the muffin pan loosely with plastic wrap and refrigerate for at least 3 hours, or preferably overnight, to allow them to firm up properly.
- Serve: Before serving, let the cheesecakes sit at room temperature for 2-3 minutes to make them easier to remove from the muffin pan. Carefully lift them out of the liners. Serve plain, or topped with your favorite fresh fruit, sauces, or other desired garnishes.
Notes
- This recipe is designed for a standard 12-cup muffin tin, resulting in mini cheesecakes compared to a full-sized cake. If you wish to make them in a mini muffin tin, reduce the bake time to approximately 10–12 minutes. For the crust, use about 1 teaspoon of mixture per cup, and for the filling, use about 1 tablespoon per cup.
- For an extra-smooth and creamy texture, you can bake these cheesecakes in a water bath, although it is absolutely not required for excellent results. If you choose this method, place the muffin tin in a larger baking pan and fill the larger pan with hot water, reaching halfway up the sides of the muffin tin.
- Don’t be alarmed if small cracks appear on the surface of your cheesecakes as they bake or cool. As the cheesecakes cool and settle, they naturally sink down, and these minor cracks often fill in on their own, becoming virtually unnoticeable.
- Readers have reported successful substitutions with lactose-free cream cheese and lactose-free sour cream. For a dairy-free option, you might experiment with dairy-free cream cheese and sour cream alternatives, though results may vary. If substituting sour cream with plain Greek yogurt, add about 1 teaspoon of lemon juice or white vinegar to the yogurt to mimic the tanginess of sour cream.
Nutrition
Calories: 153 kcal
Carbohydrates: 17 g
Protein: 2 g
Fat: 8 g
Saturated Fat: 4 g
Cholesterol: 52 mg
Sodium: 121 mg
Potassium: 42 mg
Sugar: 12 g
Vitamin A: 255 IU
Vitamin C: 0.2 mg
Calcium: 26 mg
Iron: 0.5 mg
Nutrition information is automatically calculated and should only be used as an approximation.
Additional Info
Dessert
American
Step-by-Step Guide to Crafting Gluten-Free Mini Cheesecakes
Creating these delightful gluten-free mini cheesecakes is a straightforward process, designed for enjoyment from start to finish. Follow these detailed steps to ensure perfectly baked, creamy treats every time.
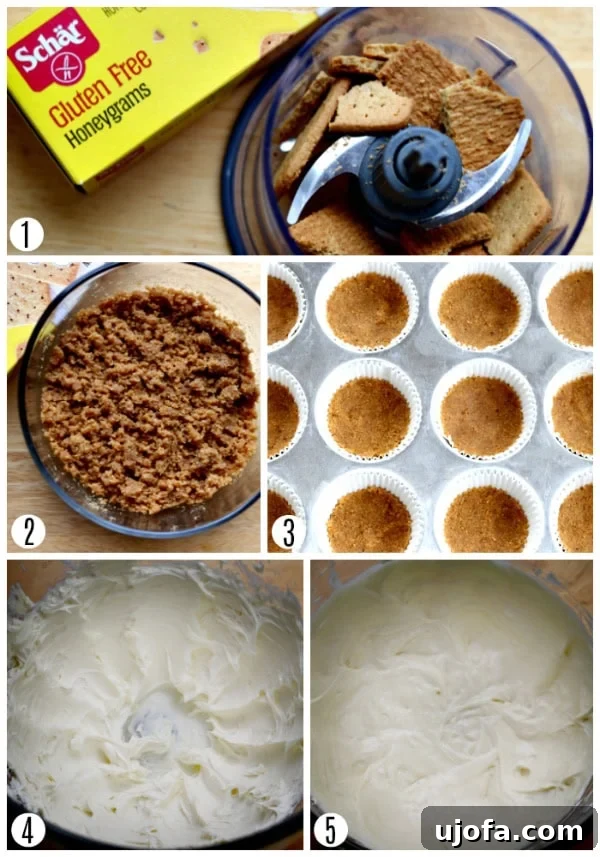
- Prepare Your Workspace and Oven: Begin by gathering all your ingredients, ensuring they are at room temperature as advised in our baking tips. Preheat your oven to 350°F (175°C). Line a standard 12-cup muffin pan with paper cupcake liners. These liners will make it easy to remove your finished cheesecakes.
- Craft the Gluten-Free Graham Cracker Crust (Photo 1): In a medium bowl, combine 1¼ cups of gluten-free graham cracker crumbs, 2 tablespoons of packed light brown sugar, and 5 tablespoons of melted butter. Mix these ingredients thoroughly until the crumbs are evenly moistened and resemble wet sand. This ensures a cohesive and flavorful crust. If you don’t have a food processor, simply place the graham crackers in a sturdy plastic bag and crush them with a rolling pin.
- Form the Crust Bases (Photo 2): Spoon approximately 1½ tablespoons of the prepared graham cracker mixture into the bottom of each cupcake liner. Use the back of a spoon or a small, flat-bottomed glass to firmly press the crumbs down, forming a compact and even crust layer at the base of each cup. This solid base is crucial for holding your cheesecake together.
- Begin the Creamy Filling (Photo 3): In a large mixing bowl, beat two 8-ounce packages of room-temperature cream cheese with an electric hand mixer or a stand mixer on low-medium speed for 1-2 minutes. The goal is to achieve a light, airy, and fluffy consistency, ensuring there are no lumps to start. Scrape down the sides of the bowl to ensure everything is incorporated.
- Incorporate Remaining Filling Ingredients (Photo 4): Add ½ cup of room-temperature sour cream to the fluffy cream cheese and beat until just combined. Next, gently mix in 2 large room-temperature eggs, ½ cup of granulated sugar, 2 teaspoons of pure vanilla extract, and 1 teaspoon of lemon juice. Continue to beat on low speed until the mixture is smooth and harmonious. Remember, once the eggs are in, avoid overmixing to prevent excess air from being incorporated, which can lead to cracks.
(Expert Tip: Always use room-temperature ingredients for the filling. This prevents lumps and ensures a smooth, uniform batter, contributing to that signature creamy cheesecake texture.)
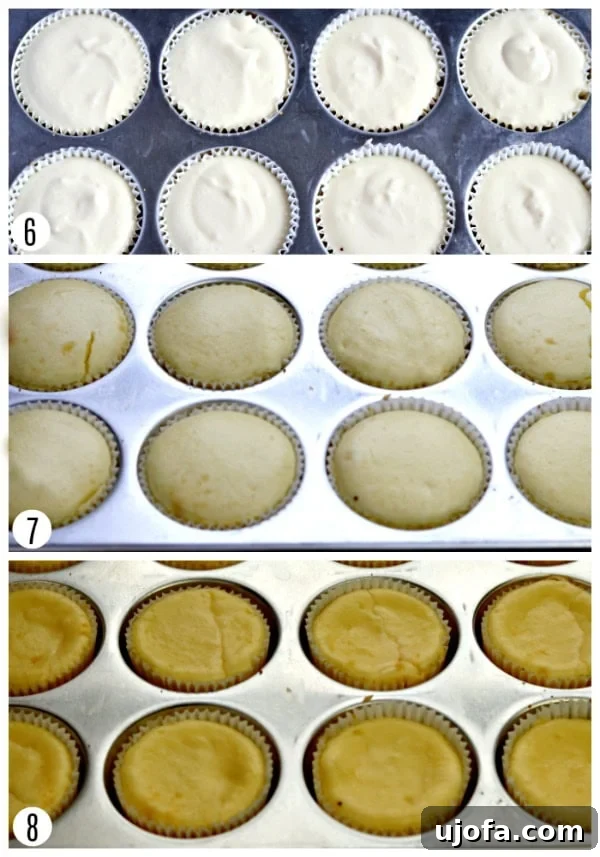
- Portion the Cheesecake Filling (Photo 6): Using a greased cookie scoop (this helps prevent sticking and ensures even portions) or a spoon, evenly divide the creamy cheesecake filling over each prepared graham cracker crust. Fill each muffin liner almost to the top, leaving just a tiny bit of room for expansion during baking.
- Bake to Golden Perfection (Photo 7): Carefully transfer the muffin pan to your preheated oven. Bake for approximately 20 minutes. You’ll know they’re ready when the edges are lightly set and just beginning to turn a golden hue, while the centers still have a slight, delicate jiggle. Don’t worry if they appear quite puffy when first removed from the oven; they will gracefully settle and flatten as they cool.
- Cool, Chill, and Serve (Photo 8): Once baked, remove the muffin pan from the oven and allow the mini cheesecakes to cool completely at room temperature on a wire rack. This gradual cooling process is vital for texture. After they are entirely cool, cover the muffin pan loosely with plastic wrap and transfer it to the refrigerator. Chill for a minimum of 3 hours, but for the best texture and flavor, chilling overnight is highly recommended. Just before serving, let them sit out for 2-3 minutes; this makes them easier to slip out of their liners. Serve them simply as they are, or unleash your creativity with your favorite toppings like fresh fruit, decadent caramel sauce, or a sprinkle of crushed cookie crumbs.
Irresistible Topping Ideas for Your Mini Cheesecakes
While these gluten-free mini cheesecakes are absolutely delicious and satisfying on their own, part of their charm lies in their versatility for customization. Elevate your dessert experience by adding your favorite toppings, transforming each bite into a unique creation. Here are some fantastic ideas to inspire you:
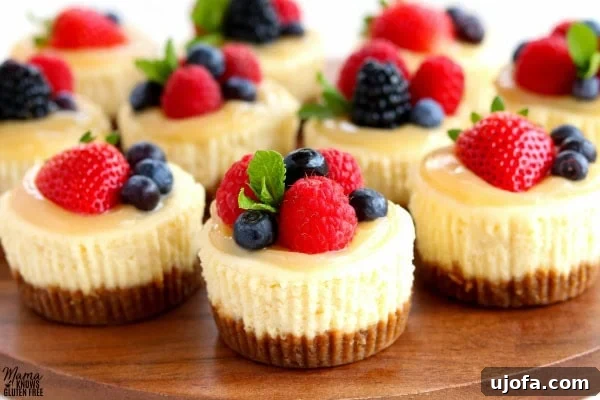
- Fresh Berries: A classic choice! Raspberries, blueberries, strawberries, or blackberries add a burst of freshness, vibrant color, and a lovely tart contrast to the creamy cheesecake.
- Strawberry Reduction Sauce: A homemade strawberry reduction offers an intense berry flavor with a beautiful glossy finish.
- Lemon Curd: For citrus lovers, a spoonful of bright and tangy lemon curd provides an exquisite zing that perfectly complements the rich cheesecake.
- Whipped Cream: A dollop of freshly whipped cream, perhaps lightly sweetened with vanilla, adds an extra layer of airy creaminess.
- Canned Cherry Pie Filling: A quick and easy way to add a fruity, sweet, and slightly tart topping that’s always a crowd-pleaser.
- Chocolate Sauce: Drizzle with rich chocolate fudge or a lighter chocolate syrup for a decadent chocolatey indulgence.
- Caramel Sauce: A sweet and buttery caramel sauce adds a luxurious touch, especially when paired with a sprinkle of sea salt.
- Crushed Cookies: Beyond graham crackers, consider crushed gluten-free Oreos, gluten-free snickerdoodle cookies, or even gluten-free shortbread for an added textural crunch.
- Nutty Toppings: Finely chopped pecans, walnuts, or almonds can add a delightful crunch and earthy flavor.
- Fruit Compotes: Beyond berries, explore compotes made from peaches, cherries, or mixed berries for seasonal variations.
Creative Serving Suggestions for Every Occasion
These gluten-free mini cheesecakes shine in their versatility, making them suitable for a wide array of events, from intimate family dinners to grand celebrations. Their individual nature simplifies serving and opens up creative presentation possibilities.
- Simple Elegance: For an understated yet elegant presentation, simply top each cheesecake with a few fresh berries and a sprig of mint. The natural beauty of the fruit speaks volumes.
- Fruity Drizzles: Enhance the flavor profile with a vibrant raspberry coulis, a tangy passion fruit syrup, or a sweet blueberry sauce drizzled artistically over each cheesecake.
- Textural Contrasts: Add an intriguing textural element by sprinkling crushed gluten-free snickerdoodles, toasted coconut flakes, or a delicate gluten-free shortbread crumble over the top.
- Cheesecake Bar Fun: For parties, transform your dessert station into an interactive cheesecake bar! Arrange bowls of various toppings—fresh berries, mini chocolate chips, nuts, sprinkles, caramel sauce, chocolate sauce, and different fruit compotes. Provide small spoons so guests can customize their own mini cheesecakes, making it a memorable and engaging experience.
- Holiday Centerpiece: Adorned with seasonal fruit like cranberries and a dusting of powdered sugar, these mini cheesecakes can be a festive highlight on any holiday dessert table, providing a lighter option amidst heavier treats.
- Bridal Showers & Baby Showers: Their delicate size and customizable nature make them perfect for elegant celebrations. You can even theme the toppings to match the event’s colors.
- Gourmet Coffee Pairings: Serve alongside a freshly brewed cup of coffee, espresso, or a specialty tea. The rich, creamy texture of the cheesecake is an ideal companion for warm beverages.
No matter how you choose to present them, these gluten-free mini cheesecakes are guaranteed to be a hit, offering a sophisticated yet easy-to-enjoy dessert for every guest.
Storage Instructions for Freshness and Convenience
One of the many benefits of these gluten-free mini cheesecakes is their suitability as a make-ahead dessert, offering both convenience and extended enjoyment. Proper storage ensures they retain their delightful texture and flavor.
- Refrigeration: Once your mini cheesecakes are completely cooled to room temperature, they must be refrigerated. The best way to store them is to cover the muffin pan loosely with plastic wrap, or transfer the cheesecakes (still in their cupcake liners) to an airtight container. They will stay fresh and delicious in the refrigerator for 3-4 days. For optimal presentation, do not remove the cupcake wrappers or add any toppings until just before you are ready to serve them. This prevents the crust from becoming soggy and keeps toppings looking their best.
- Freezing for Longer Storage: These mini cheesecakes freeze beautifully, making them an excellent option for batch baking or saving extras for a future craving. You can freeze them either still wrapped in their cupcake liners or unwrapped. To prevent them from sticking together or getting freezer burn, it’s best to place them in a single layer in a freezer-safe container. Ensure they are frozen plain, without any toppings, as some toppings may not freeze or thaw well. They can be frozen for up to 1 month.
- Defrosting Frozen Cheesecakes: To enjoy your frozen treats, simply defrost them overnight in the refrigerator. If you’re in a hurry, you can place them on the counter at room temperature for about 5-10 minutes until they soften slightly. Once thawed, you can add your favorite fresh toppings and serve.
Making a double batch is always a good idea, as these individual gluten-free cheesecakes are perfect for spontaneous entertaining or a delightful personal treat whenever the mood strikes!
Frequently Asked Questions (FAQ)
Here are answers to some common questions about making these gluten-free mini cheesecakes:
- Can I use a different type of gluten-free crust?
Absolutely! While gluten-free graham crackers are traditional, you can get creative. Try using crushed gluten-free vanilla wafers, gluten-free shortbread cookies, or even gluten-free ginger snaps for a unique flavor twist. Ensure you adjust the amount of melted butter if the texture of the crumbs is significantly different. - How can I prevent my cheesecakes from cracking?
The best ways to prevent cracks are to use room-temperature ingredients, avoid overmixing the batter (especially after adding eggs), and cool the cheesecakes gradually. Allowing them to cool in the turned-off oven with the door ajar for 10-15 minutes before transferring them to a wire rack can help prevent sudden temperature shock. - Can I make these cheesecakes dairy-free?
Yes, many readers have had success with dairy-free alternatives. You would need to substitute gluten-free dairy-free graham crackers (if available), dairy-free cream cheese, and dairy-free sour cream. Be aware that the texture and flavor might vary slightly depending on the specific brands of dairy-free products you use. - What if my cheesecakes sink in the middle?
Slight sinking is common and often happens as the cheesecakes cool and firm up. If they sink significantly, it might be due to overmixing the batter (incorporating too much air) or a sudden temperature change during cooling. Rest assured, even if they sink a bit, they will still taste delicious, especially once topped! - How far in advance can I make these?
These mini cheesecakes are an excellent make-ahead dessert! You can bake them 2-3 days in advance and store them in the refrigerator, covered. They can also be frozen for up to a month (without toppings) and thawed when needed, making them perfect for planning ahead for parties or individual treats.
More Irresistible Gluten-Free Party Desserts
If you’re looking for more crowd-pleasing gluten-free treats that are perfect for any party or gathering, explore these delightful recipes:
- Gluten-Free Chocolate Cupcakes
- Flourless Peanut Butter Cookies
- Gluten-Free Churros
- Gluten-Free Lemon Bars
- Gluten-Free Brownies
No matter the occasion, these gluten-free dessert options ensure everyone can enjoy a sweet, delectable treat!