

Wake up to the irresistible aroma of a hearty breakfast, effortlessly packed into a delicious, gluten-free muffin! Our Gluten-Free Bacon, Egg, and Cheese Muffins offer all the savory satisfaction of a full morning meal in a convenient, grab-and-go package. These incredibly easy-to-make muffins are not only perfect for busy mornings but are also freezer-friendly, making them an ideal choice for meal prepping and enjoying throughout the week. Say goodbye to rushed breakfasts and hello to flavorful, wholesome goodness, all without the gluten!

Start Your Day Right: The Ultimate Gluten-Free Bacon, Egg, and Cheese Muffins
For many of us, mornings can be a whirlwind of activity. Between getting ready, preparing for work or school, and trying to squeeze in a nutritious meal, breakfast often becomes an afterthought. But what if you could enjoy a filling, flavorful, and incredibly convenient breakfast that’s ready whenever you are? That’s exactly what these Gluten-Free Bacon, Egg, and Cheese Muffins deliver.
My family, like many others, loves muffins – not just for breakfast, but for snacks throughout the day. While I often bake sweet treats like my Easy Gluten-Free Blueberry Banana Muffins, there’s a unique satisfaction that comes from a savory breakfast. The craving for a classic bacon, egg, and cheese biscuit recently struck, but the thought of a time-consuming baking project on a busy weekday was less than appealing. That’s when inspiration struck: why not transform those beloved breakfast flavors into a simple, gluten-free muffin?
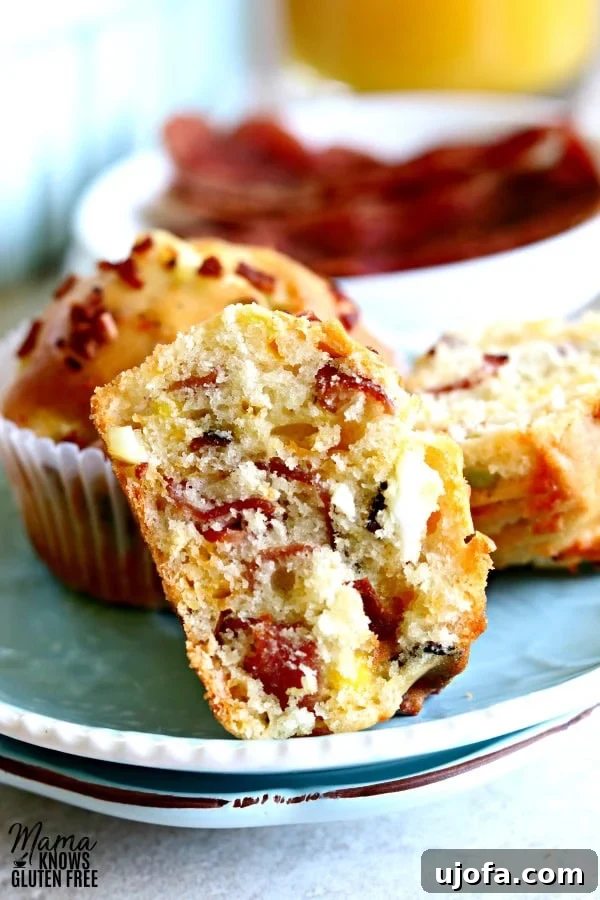
The result is nothing short of fantastic. These savory muffins bring together crispy bacon, fluffy eggs, and sharp cheddar cheese, all nestled in a tender, gluten-free batter. What’s more, the muffin batter is a true “one-bowl wonder,” minimizing cleanup and making the entire process incredibly straightforward. This recipe is a game-changer for anyone seeking an easy, make-ahead, and freezer-friendly gluten-free breakfast solution.
Why Choose Savory Gluten-Free Muffins for Breakfast?
These Gluten-Free Bacon, Egg, and Cheese Muffins aren’t just a delicious alternative; they offer a host of benefits that make them a breakfast staple:
- Unmatched Convenience: Forget scrambling eggs and frying bacon every morning. Prepare a batch of these muffins on the weekend, and you’ll have a ready-to-eat breakfast for days.
- Perfectly Portable: Whether you’re rushing out the door, need a quick bite in the car, or packing a lunch, these muffins are the ultimate grab-and-go option. No forks or plates required!
- Hearty and Satisfying: Packed with protein from eggs and bacon, and richness from cheese, these muffins are genuinely filling, keeping you energized until your next meal.
- Gluten-Free Goodness: For those with gluten sensitivities or celiac disease, finding delicious and convenient breakfast options can be a challenge. This recipe ensures everyone can enjoy a classic breakfast taste without compromise.
- Freezer-Friendly: Bake a double batch and freeze some for later. They reheat beautifully, making them an excellent choice for long-term meal planning.
- Kid-Approved: The combination of familiar breakfast flavors makes these muffins a hit with children, simplifying morning routines for parents.
Getting Started: Essential Ingredients for Your Muffins
Crafting these delightful gluten-free muffins requires a blend of pantry staples and fresh ingredients. Here’s a detailed look at what you’ll need to gather:
- Gluten-Free All-Purpose Flour: The foundation of our muffins. I highly recommend using a high-quality, cup-for-cup gluten-free flour blend. Brands like Pillsbury gluten-free offer excellent results, ensuring a tender and moist crumb without any gritty texture. If your blend doesn’t include xanthan gum, you’ll need to add it separately.
- Granulated Sugar: A touch of sugar helps balance the savory flavors and contributes to the muffin’s overall texture and browning.
- Gluten-Free Baking Powder & Baking Soda: These leavening agents are crucial for achieving light, airy muffins. Always check that your baking powder is certified gluten-free.
- Salt: Enhances all the flavors in the muffin, particularly the savory elements.
- Xanthan Gum: If your chosen gluten-free flour blend doesn’t already contain it, xanthan gum is vital for providing structure and elasticity that gluten typically offers. It prevents your muffins from becoming crumbly.
- Melted Butter (or Olive Oil): Adds richness and moisture. Using melted butter imparts a wonderful flavor, but olive oil is a great dairy-free alternative if needed.
- Eggs: Essential for binding the ingredients and adding structure. We’ll use two raw eggs in the batter and two hard-boiled eggs for the savory filling.
- Buttermilk: Contributes to the tender texture and slight tang. If you don’t have buttermilk on hand, you can easily make your own by adding 1 tablespoon of white vinegar or lemon juice to a measuring cup, then filling it to the 1-cup mark with regular milk. Let it sit for 5-10 minutes until it slightly curdles.
- Bacon: The star savory component! Choose your favorite type of bacon, whether it’s thick-cut or regular. Chopping it before cooking ensures even crisping and better distribution throughout the muffins.
- Shredded Cheddar Cheese: Adds a creamy, savory element that pairs perfectly with bacon and egg. Feel free to experiment with other cheeses like Monterey Jack or a Colby-Jack blend.
- Hard-Boiled Eggs: Provide a delightful texture and boost the protein content, making these muffins truly a “bacon, egg, and cheese” experience.
- Green Onion (Scallions): Offers a fresh, mild onion flavor and a pop of color, cutting through the richness of the other ingredients.
Mastering the Prep: Perfect Bacon and Eggs
While these muffins are largely a “one-bowl” affair, a small amount of pre-preparation for the bacon and hard-boiled eggs is key to their success. Don’t skip these simple steps for optimal flavor and texture!
Achieving Perfectly Hard-Boiled Eggs
The secret to easy-to-peel, perfectly cooked hard-boiled eggs lies in the timing and proper cooling.
- Start with Cold Water (Optional but recommended): While some prefer adding eggs to boiling water, I find starting with cold water and bringing it to a boil with the eggs results in less cracking. Gently place two eggs in a small saucepan.
- Boil and Time: Cover the eggs with about an inch of cold water. Bring the water to a rolling boil over high heat. Once boiling, reduce the heat slightly to maintain a gentle boil and set a timer for 13 minutes. This duration typically yields firm, fully cooked yolks.
- Immediate Ice Bath: As soon as the timer goes off, carefully transfer the eggs to a bowl filled with ice water. This “ice bath” immediately stops the cooking process and helps the eggshells detach more easily. Let them cool completely for at least 10-15 minutes before peeling. Once cooled, peel and chop them into small, bite-sized pieces.
Crispy, Flavorful Bacon Every Time
Crispy bacon bits are essential for that classic savory muffin experience.
- Chop Before Frying: A simple trick for perfectly uniform bacon pieces is to chop your bacon into small, desired sizes before cooking. This not only helps the bacon cook faster but also ensures a more consistent crisp texture throughout all the pieces.
- Fry to Perfection: In a large skillet, cook the chopped bacon over medium heat until it’s wonderfully crispy. Stir occasionally to ensure even cooking.
- Drain Excess Fat: Once cooked, use a slotted spoon to remove the bacon pieces from the pan and place them on a plate lined with paper towels. This helps absorb any excess grease, leaving you with perfectly crisp bacon bits for your muffins. Reserve a few pieces for sprinkling on top of the muffins before baking, if desired.

Crafting Your One-Bowl Muffin Batter
The beauty of this recipe lies in its simplicity, especially when it comes to the muffin batter. It truly is a “one-bowl wonder,” making cleanup a breeze and getting you from craving to baked goodness in no time.
Mixing the Dry Ingredients
In a large mixing bowl, combine all your dry ingredients: the gluten-free all-purpose flour, granulated sugar, gluten-free baking powder, baking soda, and salt. If your gluten-free flour blend does not contain xanthan gum, add the specified amount now. Give these dry ingredients a good whisk or stir until they are thoroughly combined. This step ensures that the leavening agents and flavor enhancers are evenly distributed throughout the flour, leading to consistent muffin rise and taste.
Adding the Wet Ingredients
Next, create a well in the center of your dry ingredients. Pour in the melted butter (or olive oil), raw eggs, and buttermilk. Stir everything together gently, just until the dry ingredients are fully moistened and combined with the wet. Be careful not to overmix; overmixing gluten-free flour can sometimes lead to tougher muffins. A few small lumps are perfectly fine.
Incorporating the Savory Fillings
Now for the star additions! Gently fold in your chopped, crispy bacon, the finely chopped hard-boiled eggs, the diced green onions, and the shredded cheddar cheese. Stir just enough to evenly distribute these delicious savory elements throughout the batter. I often save a small handful of chopped bacon to sprinkle on top of the muffins before they go into the oven – it adds a lovely visual appeal and extra crunch.

Baking to Perfection: Tips for Golden Muffins
With your batter ready, it’s time to get these savory gluten-free muffins into the oven. Proper baking techniques will ensure they come out golden, tender, and perfectly cooked.
Prepping Your Muffin Pan
Line a standard muffin pan with paper liners, or grease each cup thoroughly if you prefer not to use liners. Using liners often makes for easier cleanup and removal of the muffins.
Scooping the Batter
A trick for uniform muffins and a cleaner process is to use a greased ice cream scoop. This tool helps you portion out the perfect amount of batter for each muffin cup, resulting in evenly sized and baked muffins. Fill each muffin cup about two-thirds full. If you saved some chopped bacon, sprinkle it on top of the batter in each cup now.
Baking Time and Temperature
Preheat your oven to 375°F (190°C). Bake the muffins for 25-30 minutes. Baking times can vary depending on your oven, so it’s always a good idea to keep an eye on them. The muffins are done when they are golden brown on top and a toothpick inserted into the center of a muffin comes out clean. Avoid opening the oven door too frequently during the first 15-20 minutes of baking, as this can cause the muffins to sink.
Cooling for Best Results
Once baked, transfer the muffins from the hot pan to a wire cooling rack. Allow them to cool for a few minutes in the pan before fully moving them to the rack. Cooling on a wire rack ensures air circulation all around the muffins, preventing them from becoming soggy on the bottom and maintaining their crisp edges. While they are delicious warm, allowing them to cool slightly helps them set and makes them easier to handle.
Storage & Freezing for Ultimate Convenience
One of the best features of these Gluten-Free Bacon, Egg, and Cheese Muffins is their make-ahead and freezer-friendly nature. They are perfect for preparing in advance, making your busy mornings significantly smoother.
Short-Term Storage
Once completely cooled, store the muffins in an airtight container at room temperature for up to 2-3 days. For extended freshness, especially in warmer climates, you can also store them in the refrigerator for up to 5 days. Reheat briefly in the microwave for a warm, soft texture, or in a toaster oven for slightly crisper edges.
Freezing for Later Enjoyment
These muffins freeze exceptionally well! To freeze:
- Ensure the muffins are completely cool. Warm muffins will create condensation in the freezer bag, leading to soggy muffins and potential freezer burn.
- Place the cooled muffins in a single layer on a baking sheet and freeze for about an hour until solid. This prevents them from sticking together.
- Once solid, transfer the muffins to a freezer-safe airtight bag or container. Squeeze out as much air as possible to prevent freezer burn.
- Label with the date. They will keep well in the freezer for up to 3 months.
Reheating Frozen Muffins
To reheat, simply remove a frozen muffin from the freezer. You can:
- Microwave: Place a muffin on a microwave-safe plate and microwave on high for 30-60 seconds, or until heated through.
- Oven/Toaster Oven: For a slightly crisper exterior, wrap a muffin in foil and bake in a preheated oven at 300°F (150°C) for about 10-15 minutes, or until warmed through.
Having a stash of these delicious gluten-free breakfast muffins in your freezer is a true game-changer for quick, satisfying meals any day of the week.
Serving Suggestions and Delicious Variations
These Bacon, Egg, and Cheese Muffins are fantastic on their own, but they also offer versatility for various meal occasions and flavor adjustments.
Serving Ideas:
- Classic Breakfast: Serve warm with a side of fresh fruit or a glass of orange juice for a complete and balanced breakfast.
- Brunch Delight: These make an excellent addition to a brunch spread, alongside a vibrant salad or other savory dishes.
- Quick Snack: Perfectly sized for a protein-packed snack to curb hunger between meals.
- Lunchbox Hero: Pack one in a lunchbox for a delicious and satisfying midday meal.
- With a Spread: While not strictly necessary, a smear of cream cheese, a dollop of hot sauce, or a drizzle of maple syrup (for a sweet and savory kick!) can elevate the experience.
Flavor Variations to Explore:
Don’t be afraid to get creative and customize these muffins to your taste!
- Add Vegetables: Incorporate finely diced bell peppers, spinach (sautéed and squeezed dry), mushrooms, or even a tablespoon of sun-dried tomatoes for extra nutrients and flavor.
- Spice It Up: A pinch of red pepper flakes in the batter or a dash of hot sauce on top can add a pleasant kick.
- Different Cheeses: Experiment with different shredded cheeses like Gruyere, mozzarella, pepper jack, or a sharp provolone for varying flavor profiles.
- Herbaceous Notes: Fresh herbs like chives, parsley, or a touch of dried thyme can add aromatic depth.
- Meat Alternatives: While bacon is classic, you could try cooked and crumbled breakfast sausage, diced ham, or even a plant-based bacon substitute for a different twist.
The possibilities are endless, making this recipe a fantastic canvas for your culinary imagination!
Embracing Gluten-Free Baking with Confidence
For those new to gluten-free baking, the process might seem daunting at first. However, with the right ingredients and a few simple tips, you can achieve delicious results every time. Gluten-free flours behave differently than traditional wheat flour; they lack the elastic gluten proteins that provide structure and chewiness. This is why ingredients like xanthan gum are often crucial in gluten-free recipes – they act as a binder, mimicking the role of gluten and preventing baked goods from becoming crumbly or dense.
When working with gluten-free flour blends, it’s essential to use a good quality, cup-for-cup blend designed for baking. These blends typically contain a combination of different flours (rice flour, potato starch, tapioca flour, etc.) and often include xanthan gum. If your blend doesn’t, remember to add it separately as indicated in the recipe to ensure your muffins hold together beautifully. Avoid overmixing the batter, as this can still lead to a tougher texture even without gluten. Mix just until the ingredients are combined, and a few lumps are perfectly acceptable.
Baking gluten-free doesn’t mean sacrificing flavor or texture. These Bacon, Egg, and Cheese Muffins are a testament to how satisfying and delicious gluten-free breakfasts can be. They’re a fantastic way to introduce more gluten-free options into your diet without feeling like you’re missing out on your favorite comfort foods. Enjoy the freedom and deliciousness of gluten-free baking!

Recipe Card: Gluten-Free Bacon, Egg and Cheese Muffins
Gluten-Free Bacon, Egg and Cheese Muffins
By: Audrey from Mama Knows Gluten Free
Servings: 23
Prep: 15 mins
Total: 40 mins
Gluten-Free Bacon, Egg and Cheese Muffins have all of the flavors of a big hearty breakfast packed into a muffin. They are super easy to make and are perfect for a grab and go breakfast.
Ingredients
- 2 cups gluten-free all-purpose flour (I like Pillsbury gluten-free)
- 1/4 cup sugar
- 1 tablespoon gluten-free baking powder
- 1/2 teaspoon baking soda
- 1/2 teaspoon salt
- 1/2 teaspoon xanthan gum (leave out if your flour already has it)
- 1 cup butter, melted (or olive oil)
- 2 eggs
- 1 cup buttermilk (To make your own buttermilk add 1 tablespoon of white vinegar to the milk and let sit for a few minutes.)
- 1 cup bacon, chopped
- 1 cup cheddar cheese, shredded
- 2 hard-boiled eggs, chopped
- 1 green onion, diced
US Customary – Metric
Instructions
- Preheat oven to 375° F (190°C).
- Add water to a small pan and bring to a boil. Place 2 eggs in the pan and boil for 13 minutes. Once the eggs are finished cooking, place them in a small bowl of ice water in the refrigerator to cool completely.
- I like to cut the bacon into small pieces before I fry it. In a large pan, cook the bacon until crispy. Remove the bacon from the pan and place on a paper-towel-lined plate to drain excess fat.
- In a large bowl, add the gluten-free flour, sugar, xanthan gum (if your flour blend doesn’t include it), baking powder, baking soda, and salt. Whisk or stir well to combine all dry ingredients.
- Add the raw eggs, melted butter, and buttermilk to the dry ingredients and mix until just fully combined. Be careful not to overmix.
- Chop the green onions and the hard-boiled eggs. For the hard-boiled eggs, a hard-boiled egg slicer works great; slice the egg both ways (vertical then horizontal) to get a perfectly chopped egg every time.
- Add the chopped bacon, chopped green onions, chopped hard-boiled eggs, and shredded cheddar cheese to the muffin batter. Stir gently to fully mix these savory ingredients into the batter. (Optional: save a few chopped bacon pieces to sprinkle on top of the muffins.)
- Scoop batter into lined muffin pans, filling each cup about two-thirds full. A greased ice cream scoop makes this process less messy and ensures even portions. If desired, sprinkle the reserved chopped bacon on top of the muffin batter.
- Bake for 25-30 minutes. Baking times may vary, so please watch your muffins. Use a toothpick inserted into the center to check if they are done; it should come out clean.
- Enjoy! These muffins can be stored in an airtight container at room temperature or refrigerated, or frozen for later.

Notes
Mama says, “Check all of your labels to ensure they are gluten-free!”
Nutrition
- Serving:
- 1g
- Calories:
- 166kcal
- Carbohydrates:
- 10g
- Protein:
- 4g
- Fat:
- 12g
- Saturated Fat:
- 6g
- Cholesterol:
- 61mg
- Sodium:
- 281mg
- Potassium:
- 98mg
- Fiber:
- 1g
- Sugar:
- 3g
- Vitamin A:
- 360IU
- Vitamin C:
- 0.1mg
- Calcium:
- 84mg
- Iron:
- 0.6mg
Nutrition information is automatically calculated, so should only be used as an approximation.
Additional Info
Course: Breakfast
Cuisine: American
Looking for More Delicious Gluten-Free Breakfast Muffin Recipes?
If you loved these savory muffins, you’re in for a treat! Our collection of gluten-free muffin recipes is designed to bring joy back to your breakfast and snack times, catering to various tastes and preferences. Explore more delightful options that are just as easy to make and equally satisfying:
- Gluten-Free English Muffins: Perfect for splitting, toasting, and slathering with butter or jam.
- Gluten-Free Banana Muffins: A classic sweet treat, moist and full of banana flavor.
- Gluten-Free Zucchini Muffins: A wonderful way to sneak in some veggies, these are surprisingly moist and flavorful.
We hope you enjoy these Gluten-Free Bacon, Egg, and Cheese Muffins as much as our family does. They truly make breakfast a pleasure, even on the busiest days!