
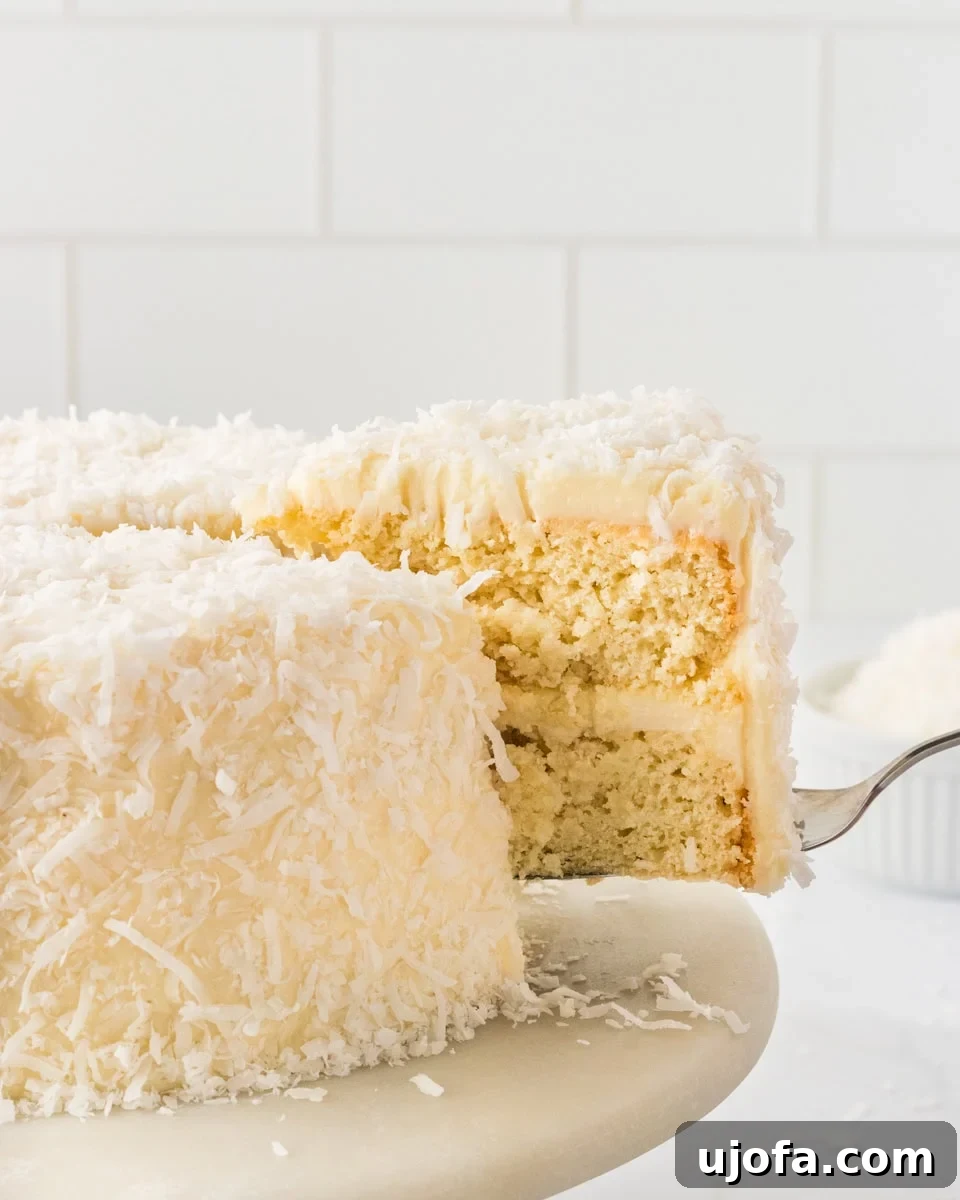
Welcome to the ultimate guide for baking a truly exceptional gluten-free coconut cake! This recipe delivers a soft, incredibly moist, and wonderfully flavorful coconut cake that will impress even the most discerning palates. Crafted with a carefully selected gluten-free flour blend, rich coconut milk, and fragrant shredded coconut, each slice offers layers of pure bliss. The delicate, airy texture of the cake is perfectly complemented by a luscious, tangy coconut cream cheese frosting, creating a dessert that feels both elegant and comforting. Whether you’re celebrating a special birthday, hosting a holiday gathering, or simply yearning for a taste of tropical indulgence, this homemade gluten-free cake is surprisingly straightforward to prepare and guaranteed to be a crowd-pleaser.
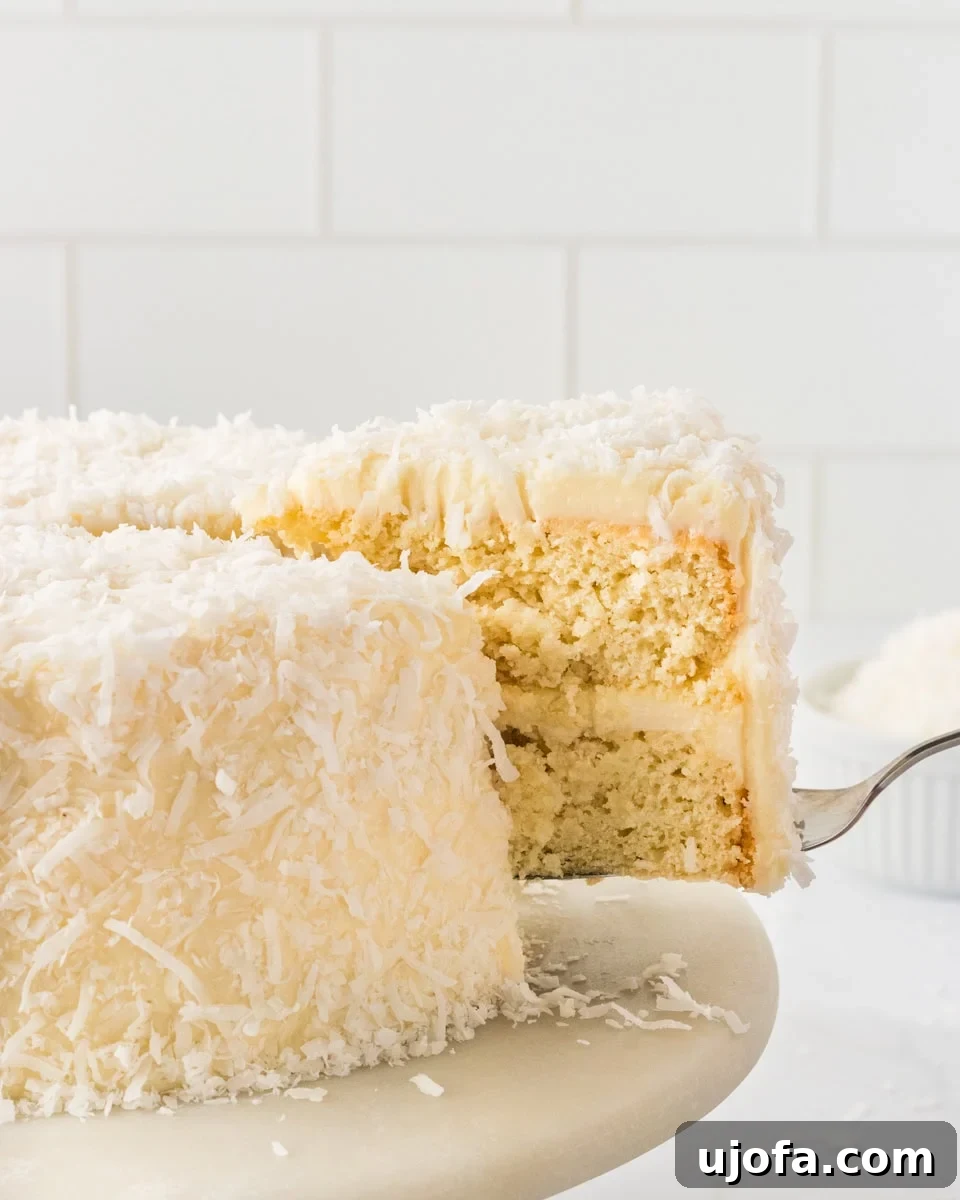
My goal in developing this recipe was to create a gluten-free coconut cake that excels in every aspect: light, moist, fluffy, and with an impeccable balance of sweetness. The cake layers achieve their remarkable tenderness through the strategic use of coconut milk and a touch of vegetable oil. To enhance both texture and an intense coconut flavor, I incorporate sweet shredded coconut directly into the batter. But the true star for me is often the cream cheese frosting. Its subtle tanginess provides a delightful contrast to the inherent sweetness of the coconut and sugar in the cake, creating a harmonious flavor profile. This frosting whips up effortlessly, resulting in a smooth, creamy consistency that spreads like a dream over each cake layer. For those who adore coconut desserts as much as I do, the addition of coconut extract truly elevates the flavor to new heights, making this cake an absolute must-try. However, if you prefer a more understated coconut note, you can certainly omit the extract. I’m always eager to hear your thoughts and experiences in the comments section!
Why You’ll Adore This Gluten-Free Coconut Cake
There are countless reasons why this gluten-free coconut cake has become a staple in my kitchen and a favorite among friends and family. First and foremost, its ability to deliver an authentic, rich coconut experience without any gluten is truly remarkable. The cake’s texture is a triumph: light, airy, yet incredibly moist, a characteristic often hard to achieve in gluten-free baking. The blend of coconut milk and oil ensures a tender crumb that melts in your mouth, while the shredded coconut flecks add a delightful chewiness. The subtle saltiness of the cream cheese frosting is a game-changer, perfectly cutting through the sweetness and preventing the cake from becoming overly rich. It’s a sophisticated flavor combination that appeals to a wide range of tastes.
Beyond its incredible taste and texture, this recipe stands out for its simplicity. Despite its elegant appearance, it uses common pantry ingredients and straightforward baking techniques, making it accessible even for novice bakers. The step-by-step instructions are easy to follow, guiding you through each stage to ensure a successful outcome. Plus, the versatility of this cake makes it suitable for various occasions. Dress it up for a grand celebration or keep it simple for a cozy family dessert. It’s a recipe that builds confidence in gluten-free baking and proves that dietary restrictions don’t mean sacrificing flavor or enjoyment. Once you try this cake, you’ll understand why it quickly becomes a cherished favorite!
Expert Tips for Perfecting Your Gluten-Free Coconut Cake
Achieving a flawless gluten-free coconut cake involves a few key techniques and considerations. Having tested this recipe extensively, I’ve compiled essential tips to ensure your cake turns out light, moist, and utterly delicious every single time.
- Choose the Right Gluten-Free Flour Blend: The type of gluten-free flour used can significantly impact your cake’s texture. This recipe was meticulously developed using Pillsbury Gluten Free Flour, which already contains a balanced mix of starches and binders crucial for a tender crumb. Different brands have varying ratios of rice flour, starches, and gums, which can lead to vastly different results. Sticking to the recommended blend or finding one with a similar composition will yield the best outcome.
- Measure Flour Accurately (Weigh it if Possible): Gluten-free flours are notorious for being easily over-measured when scooped with a cup. Even a slight excess can make your cake dense and dry. For consistent and precise results, I highly recommend using a digital kitchen scale to weigh your flour. If you don’t have a scale, gently spoon the flour into your measuring cup and level it off with a straight edge, rather than scooping directly from the bag.
- Do Not Overbake Your Cake Layers: Gluten-free cakes tend to dry out more quickly than traditional wheat-based cakes. Begin checking for doneness around the 20-minute mark. The cake is ready when a toothpick inserted into the center comes out clean or with just a few moist crumbs attached. An overbaked cake will lose its coveted moistness and become crumbly.
- Ensure Cake Layers Are Completely Cooled Before Frosting: Patience is paramount here. If your cake layers are even slightly warm when you apply the cream cheese frosting, the frosting will melt, soften, and slide, making assembly a messy and frustrating task. Allow the layers to cool completely on a wire rack – this can take up to 2 hours or more, depending on your environment.
- Use Room Temperature Ingredients: This applies to eggs, butter, and especially cream cheese. Room temperature ingredients emulsify and blend much more smoothly. This creates a more uniform batter, which helps the cake bake evenly, and a light, creamy, lump-free frosting that’s a joy to spread. Plan ahead by taking these ingredients out of the refrigerator at least 30 minutes to an hour before you begin baking.
- Mix the Batter Just Until Combined: Once you’ve added the dry ingredients to the wet, mix only until no flour streaks are visible. Overmixing gluten-free batter can develop the starches too much, resulting in a tighter, tougher, and less fluffy cake crumb. A gentle hand and minimal mixing are key to maintaining a tender texture.
- Grease and Line Your Pans Properly: To prevent sticking and ensure easy release, always grease your cake pans thoroughly and line the bottoms with parchment paper. This simple step saves a lot of frustration.
- Full-Fat Coconut Milk is Key: For the richest flavor and optimal moisture, opt for full-fat canned coconut milk, not the beverage type found in cartons. Shake the can well before opening to ensure the cream and liquid are fully incorporated.
Gluten-Free Coconut Cake Recipe
Here’s the complete, streamlined recipe for this incredible gluten-free coconut cake, designed for ease and delicious results.
Gluten-Free Coconut Cake
By: Julia Elizabeth
Servings: 12 servings
Prep Time: 1 hour
Cook Time: 25 minutes
Total Time: 1 hour 25 minutes
Gluten-free coconut cake with soft, fluffy layers made from coconut milk and shredded coconut, topped with creamy coconut cream cheese frosting. Perfect for birthdays or holidays.
Equipment
- 2 8-inch cake pans
- Hand or stand mixer
- Mixing bowls
- Wire rack
- Offset spatula (for frosting)
Ingredients
For the Cake
- 2½ cups gluten-free flour (I recommend Pillsbury Gluten Free Flour)
- ½ cup sweetened shredded coconut flakes
- 2 tsp baking powder
- 1 tsp salt
- 1½ cups sugar
- 4 eggs, room temperature
- ¼ cup vegetable oil
- ¾ cup full-fat coconut milk
- 1½ tsp vanilla extract
- 1 tsp coconut extract (optional, for intensified coconut flavor)
For the Cream Cheese Frosting
- 8 oz cream cheese, room temperature
- 1 cup (2 sticks) unsalted butter, room temperature
- 6½ cups powdered sugar
- 2 tbsp coconut milk
- 1 tsp vanilla extract
- ½ tsp salt
- Sweetened shredded coconut flakes, for decoration
Instructions
- Preheat your oven to 350°F (180°C). Grease two 8-inch cake pans and line the bottoms with parchment paper.
- In a medium bowl, whisk together the gluten-free flour, shredded coconut, baking powder, and salt until well combined. Set aside.
- In a large bowl, whisk together the room-temperature eggs and sugar until smooth and slightly lighter in color. Stir in the full-fat coconut milk, vegetable oil, vanilla extract, and coconut extract (if using) until fully combined and glossy.
- Gradually add the dry ingredients to the wet ingredients. Gently stir until just combined, ensuring no dry streaks of flour remain. Be careful not to overmix the batter.
- Pour the coconut cake batter evenly into the two prepared cake pans. Bake for 20-25 minutes, or until a toothpick inserted into the center comes out clean or with a few moist crumbs.
- Once baked, let the cakes cool in the pans on a wire rack for 5-10 minutes. Then, carefully invert them onto the wire rack to cool completely before frosting.
- While the cake layers cool, prepare the cream cheese frosting. In a large bowl with a hand or stand mixer, beat the room-temperature butter and cream cheese together until light, fluffy, and smooth (about 2-3 minutes).
- Gradually add the powdered sugar, starting on low speed to prevent it from flying out of the bowl. Once mostly incorporated, increase the speed and beat until the frosting is smooth and thick.
- Add the coconut milk, vanilla extract, and salt to the frosting. Mix again until the frosting is silky, creamy, and easily spreadable.
- To assemble the cake, place a small dollop of frosting on your cake stand or serving plate to anchor the first layer. Place one cooled cake layer on top. Spread an even, generous layer of frosting over the top.
- Carefully place the second cake layer on top and gently press to level. Use the remaining frosting to evenly cover the top and sides of the entire cake with an offset spatula.
- While the frosting is still fresh, gently press sweetened shredded coconut flakes onto the sides of the cake. Sprinkle additional coconut flakes over the top for a beautiful finish.
- Slice and serve your delicious gluten-free coconut cake. Enjoy!
Nutrition
Nutrition information is an approximation only.
Serving: 1 slice | Calories: 748kcal | Carbohydrates: 112g | Protein: 6g | Fat: 33g | Saturated Fat: 19g | Polyunsaturated Fat: 4g | Monounsaturated Fat: 8g | Trans Fat: 1g | Cholesterol: 114mg | Sodium: 577mg | Potassium: 103mg | Fiber: 3g | Sugar: 92g | Vitamin A: 806IU | Vitamin C: 0.2mg | Calcium: 92mg | Iron: 2mg
Additional Info
Course: Baking, Dessert
Cuisine: American
Serving Suggestions for Your Gluten-Free Coconut Cake
This gluten-free coconut cake is an absolute dream, especially wonderful for spring celebrations when lighter, brighter flavors are desired. Its tropical essence and delicate texture make it a versatile dessert for various occasions. Here are some ideas to elevate your serving experience:
- Spring Gatherings: The light, fluffy coconut layers and creamy frosting make it a perfect centerpiece for Easter brunch, Mother’s Day, or spring garden parties. Serve it with a fresh fruit salad featuring berries, mango, or pineapple to complement the coconut notes.
- Birthday Celebrations: A slice of this cake is a joyful treat for any birthday. Pair it with a scoop of vanilla bean ice cream or a drizzle of homemade caramel sauce for an extra touch of decadence. Add some colorful sprinkles for a festive look!
- Holiday Meals: While traditionally a spring dessert, coconut cake can also bring a refreshing change to holiday tables during Thanksgiving or Christmas. It offers a lighter alternative to heavier holiday pies and puddings.
- Tropical Pairings: For a truly tropical spread, consider serving this coconut cake alongside a vibrant gluten-free pineapple upside-down cake. The bright, tangy pineapple perfectly complements the sweet, creamy coconut.
- Coffee or Tea Companion: This cake is exquisite with a freshly brewed cup of coffee, a fragrant Earl Grey tea, or even a delightful iced tea for warmer days. The balanced sweetness makes it an ideal afternoon treat.
- Dairy-Free Adaptation: If you need to make the cake entirely dairy-free (the cake layers are already dairy-free!), simply substitute the cream cheese frosting with a luscious dairy-free buttercream frosting. Remember to incorporate coconut flakes and a touch of coconut extract into the dairy-free frosting to maintain that beloved classic coconut flavor.
- Garnish Ideas: Beyond shredded coconut, consider garnishing individual slices with fresh mint leaves, a few toasted coconut flakes for added crunch, or even a delicate edible flower for an elegant presentation.
No matter how you choose to serve it, this gluten-free coconut cake is sure to bring smiles and satisfy cravings for a truly delicious, wholesome dessert.
Storage Instructions and Make-Ahead Tips
One of the beauties of this gluten-free coconut cake is its flexibility when it comes to preparation and storage, allowing you to bake ahead and enjoy fresh cake whenever the craving strikes. Proper storage ensures your cake remains moist and delicious for days.
Making Ahead: If you’re planning for a special event, you can certainly break up the baking process. I frequently bake the cake layers a day in advance. Once they are completely cool, wrap each unfrosted layer tightly in plastic wrap to prevent them from drying out, then store them in the refrigerator. The cream cheese frosting can also be made ahead of time. Prepare it as directed, then transfer it to an airtight container and refrigerate. When you’re ready to assemble the cake, simply let the chilled frosting sit at room temperature for 20–30 minutes to soften slightly. Give it a quick whip with your mixer for a minute or two until it’s smooth and spreadable again.
Refrigeration: Because the frosting is made with cream cheese, the assembled cake must be stored in the refrigerator. The best way to keep your finished cake fresh and prevent it from drying out is in a dedicated cake carrier. If you don’t have one, you can loosely tent the cake with plastic wrap, ensuring it doesn’t touch the frosting. Stored properly, the cake will remain fresh for up to 5 days. For the best eating experience, I recommend letting individual slices sit at room temperature for about 20–30 minutes before serving. This allows the cake layers to soften and the cream cheese frosting to return to its creamy, luscious texture, enhancing the overall flavor and mouthfeel.
Freezing Instructions: This gluten-free coconut cake freezes exceptionally well, particularly the unfrosted cake layers. This is a fantastic option for meal prepping desserts or saving portions for later enjoyment.
- Freezing Unfrosted Layers: Once your cake layers have cooled completely, wrap each layer tightly in several layers of plastic wrap, followed by a layer of aluminum foil. This double protection helps prevent freezer burn. You can freeze the layers for up to 2 months. When you’re ready to use them, thaw the wrapped layers overnight in the refrigerator. Once thawed, unwrap and proceed with frosting and assembly as usual.
- Freezing Frosted Slices: You can also freeze individual frosted slices for convenient single-serving treats. Place slices on a baking sheet and freeze until firm (about 1-2 hours). Then, wrap each frozen slice tightly in plastic wrap and store in a freezer-safe bag or container. Thaw slices in the refrigerator or at room temperature. Be aware that while the cake itself will thaw beautifully, the shredded coconut topping might lose a little bit of its crisp texture once thawed, but the flavor will still be fantastic.
With these storage tips, you can enjoy your delicious gluten-free coconut cake over several days or even months, making it an incredibly convenient and satisfying dessert.
More Gluten-Free Celebration Desserts to Enjoy
If you’re looking for more delightful gluten-free treats to celebrate with, or simply to satisfy your sweet tooth, here are some of my other cherished recipes that are perfect for any occasion:
- Gluten-Free Crustless Coconut Pie: For coconut lovers seeking an easier route than a layer cake, this crustless coconut pie is an excellent choice. It bakes into a rich, creamy custard-style pie with a lightly chewy, caramelized coconut topping. Made with simple pantry ingredients, it’s a comforting dessert that comes together quickly.
- Gluten-Free Birthday Cake: This festive gluten-free birthday cake is the epitome of celebration. It features light, fluffy vanilla cake layers studded with colorful sprinkles, topped with a rich and velvety chocolate buttercream. It’s a fun and delicious dessert that everyone at your party can enjoy.
- Gluten-Free Coconut Cream Pie: Another fantastic option for those who can’t get enough of coconut! This gluten-free coconut cream pie boasts a silky-smooth coconut custard filling, nestled in a naturally gluten-free crust, and crowned with a generous layer of fluffy whipped topping. It’s a creamy, classic dessert that never disappoints.
- Gluten-Free Yellow Cake: Sometimes, a simple classic is all you need. This gluten-free yellow cake is consistently a reliable favorite. It’s wonderfully soft, subtly buttery, and provides the perfect canvas for your favorite buttercream frosting, making it ideal for any birthday or special occasion.
I hope you thoroughly enjoy exploring these gluten-free dessert options, each crafted to bring joy and deliciousness to your table without compromising on taste or texture!