

Indulge in the perfect cozy treat with this easy gluten-free orange and cranberry scones recipe. These delightful pastries are wonderfully flaky, perfectly sweet, and incredibly delicious with your favorite cup of coffee or tea. Plus, they’re easily made dairy-free to suit various dietary needs!

Flaky & Flavorful: Your Ultimate Guide to Easy Gluten-Free Orange Cranberry Scones
There’s nothing quite like a warm, flaky scone to brighten your morning or complement an afternoon tea. For those navigating gluten sensitivities or simply seeking delicious alternatives, this recipe for Easy Gluten-Free Orange Cranberry Scones is an absolute game-changer. Imagine biting into a pastry that boasts the perfect balance of tart cranberries, bright orange zest, and a tender, buttery crumb – all meticulously crafted to be entirely gluten-free! This recipe is designed to deliver that authentic bakery-style scone experience, making gluten-free baking not only accessible but truly enjoyable. Whether you’re a seasoned baker or new to the gluten-free world, you’ll find this guide surprisingly simple and incredibly rewarding, transforming everyday ingredients into an extraordinary treat.
Why You’ll Fall in Love with This Gluten-Free Scones Recipe
Our gluten-free orange cranberry scones aren’t just a substitute; they’re a celebration of exquisite flavor and delightful texture, proving that dietary restrictions never mean sacrificing deliciousness. Here’s what truly makes this recipe a standout in any baker’s repertoire:
- Authentic Bakery Taste and Texture: Prepare to be amazed by scones that rival those from your favorite artisan bakery. These feature a perfectly flaky exterior and a tender, moist interior that melts in your mouth, a hallmark of expertly made scones.
- Gluten-Free & Dairy-Free Friendly: Meticulously developed to be naturally gluten-free, this recipe also offers clear and straightforward dairy-free substitution options, ensuring everyone can enjoy these delightful pastries without compromise.
- Effortless Preparation: Designed with simplicity in mind, this recipe streamlines the scone-making process, guaranteeing a fool-proof and satisfying experience even for novice bakers. Say goodbye to complicated steps and hello to baking success!
- Festive & Flavorful: The vibrant and harmonious combination of tart, juicy cranberries and aromatic orange zest makes these scones an ideal choice for holiday breakfasts, festive brunches, or any special occasion where a touch of elegance and flavor is desired.
- Freezer-Friendly Convenience: Maximize your baking efforts by preparing a larger batch. Enjoy some immediately, then easily freeze the rest for a quick, homemade treat available anytime the craving strikes.
- Highly Customizable Flavor Profile: While the classic orange and cranberry pairing is undeniably delicious, this versatile recipe provides an excellent base for exploring a myriad of other mix-ins and flavor combinations.
- Fun for the Whole Family: Get everyone involved! This recipe offers a wonderful opportunity for family bonding in the kitchen, from measuring ingredients to the joyous task of glazing the finished scones.
Understanding Your Ingredients for Scone Perfection
Success in gluten-free baking often hinges on a deep understanding of how each ingredient contributes to the final product. While traditional scones typically rely on wheat flour and conventional butter, our gluten-free version employs specific components and techniques to achieve that desired flaky texture and rich flavor profile. Here’s an in-depth look at what you’ll need and why each element is crucial:
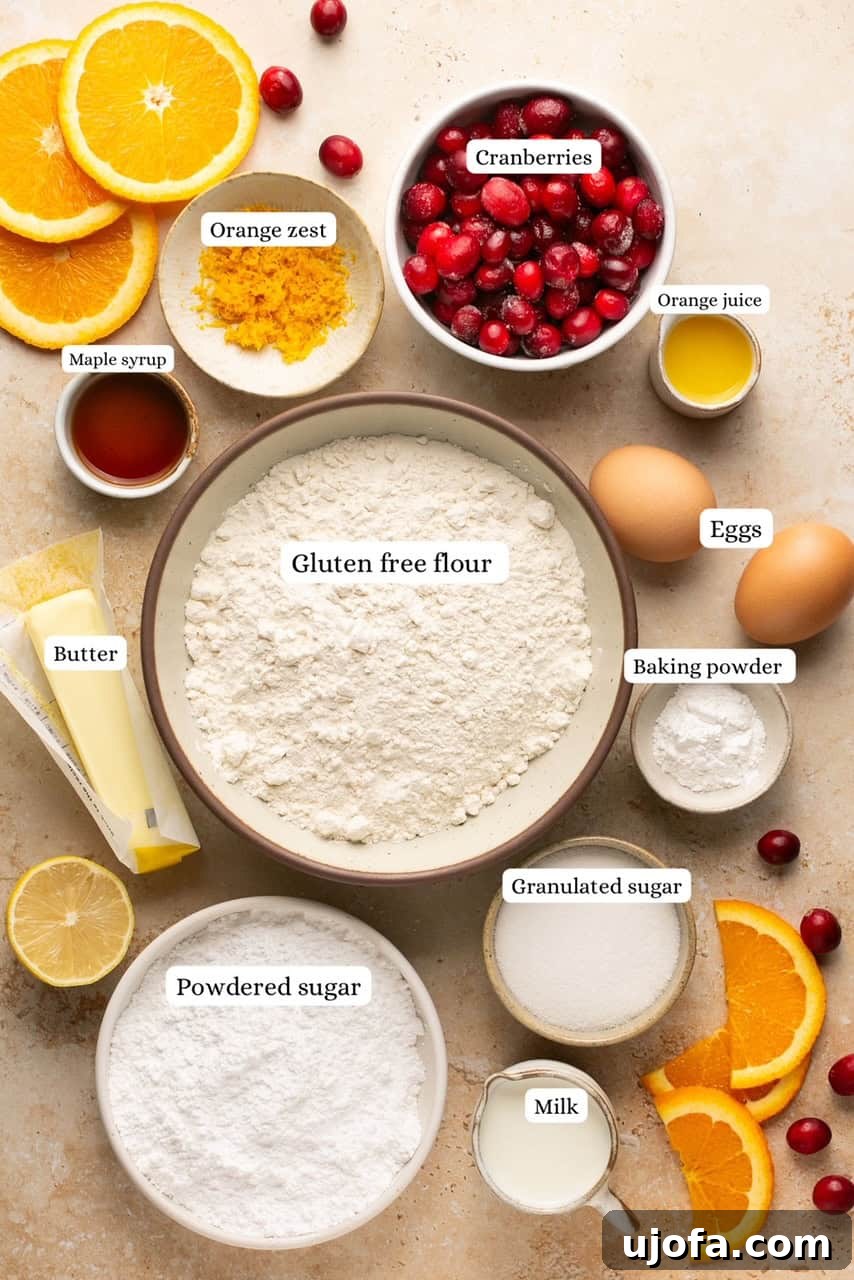
Gluten-Free Flour Blend: This is the cornerstone of our gluten-free scones. For consistent, excellent results, I highly recommend using a “measure for measure” (also known as “1-to-1” or “cup-for-cup”) gluten-free all-purpose flour blend. Brands like King Arthur Baking Measure for Measure Gluten Free Flour are specifically formulated to replace wheat flour in most recipes without requiring additional binders or starches. These blends reliably deliver the desired structure and texture. While other brands might work, individual results can vary significantly, so sticking to a tried-and-true blend is advised.
Granulated Sugar: This provides the perfect foundational sweetness to the scone dough. Additionally, a small amount is intentionally reserved for sprinkling on top of the scones just before they enter the oven. This creates a delightful, glistening, and slightly crunchy golden crust, adding another layer of texture and flavor.
Gluten-Free Baking Powder: As a crucial leavening agent, baking powder is indispensable for ensuring our scones rise beautifully and achieve their characteristic light, airy, and tender crumb. For individuals with Celiac disease or heightened gluten sensitivity, it is paramount to always verify that your chosen baking powder brand is certified gluten-free, as some may contain hidden gluten-containing ingredients.
Salted Butter (Frozen and Grated): This is arguably the most critical component for achieving those signature flaky layers. Employing *very cold or frozen* salted butter, grated directly into the dry ingredients, is key because it prevents the butter from melting prematurely. As the scones bake, these tiny pockets of cold butter melt, releasing steam that dramatically separates the layers of dough, resulting in an irresistibly delicate and flaky texture. For those needing a dairy-free option, high-quality vegan butter brands such as Miyoko’s Kitchen or Kite Hill are fantastic substitutes, yielding similarly delicious results.
Whole Milk: The milk contributes essential richness and moisture to the scone dough, aiding in its tender development. If you are preparing a dairy-free version, unsweetened almond milk or full-fat canned coconut milk are excellent and readily available substitutes. It’s important to choose unsweetened varieties to maintain precise control over the overall sweetness of your scones.
Eggs: This recipe utilizes two eggs for distinct purposes. One egg is carefully incorporated directly into the scone dough, where it functions as a vital binding agent, helping to hold all ingredients together, adding structural integrity, and enriching the dough. The second egg is whisked separately to create an egg wash, which is generously brushed over the tops of the scones prior to baking. This egg wash is instrumental in developing a beautiful golden-brown color and a wonderfully crispy, glossy exterior.
Orange Zest: The finely grated zest from approximately one medium orange is what truly infuses these scones with their vibrant, aromatic, and bright citrusy flavor. This zest perfectly complements the tartness of the cranberries, creating a harmonious and uplifting taste profile. Do not skip this ingredient if you desire that quintessential orange cranberry flavor!
Fresh Cranberries: Whether you opt for fresh or frozen cranberries, they are essential for adding a delightful burst of tartness and a visually appealing pop of crimson color to each scone. If using frozen cranberries, there is no need to thaw them beforehand; simply add them directly to the dough.
Lemon Juice: When combined with milk, a small amount of lemon juice magically creates a quick homemade “buttermilk.” The acidity from the lemon juice reacts synergistically with the baking powder, significantly enhancing the leavening process and contributing to an exceptionally tender and moist crumb structure.
Vanilla Extract: A touch of pure vanilla extract is added to round out the complex flavors, introducing a subtle warmth and depth that beautifully enhances both the citrus and berry notes in the scones.
Powdered Sugar & Orange Juice (for Glaze): These two simple ingredients are whisked together to form an elegant and quick orange glaze. This final drizzle adds a perfect additional layer of sweetness and a final burst of citrusy brightness, making the finished scones not only more delicious but also visually appealing.
How to Bake These Easy Gluten-Free Scones: A Detailed Step-by-Step Guide
Crafting these delightful gluten-free orange cranberry scones is a surprisingly straightforward process, especially when you follow these meticulous steps. Remember, precision in measurements and a light touch when handling the dough are your secrets to achieving that coveted flaky, tender texture.
- Prepare Your Oven and Baking Sheet: Begin by preheating your oven to 400°F (200°C). It’s crucial to have your oven at the correct temperature before the scones go in. Next, line a large baking sheet with a sheet of parchment paper. This prevents sticking and promotes even baking and easy cleanup.
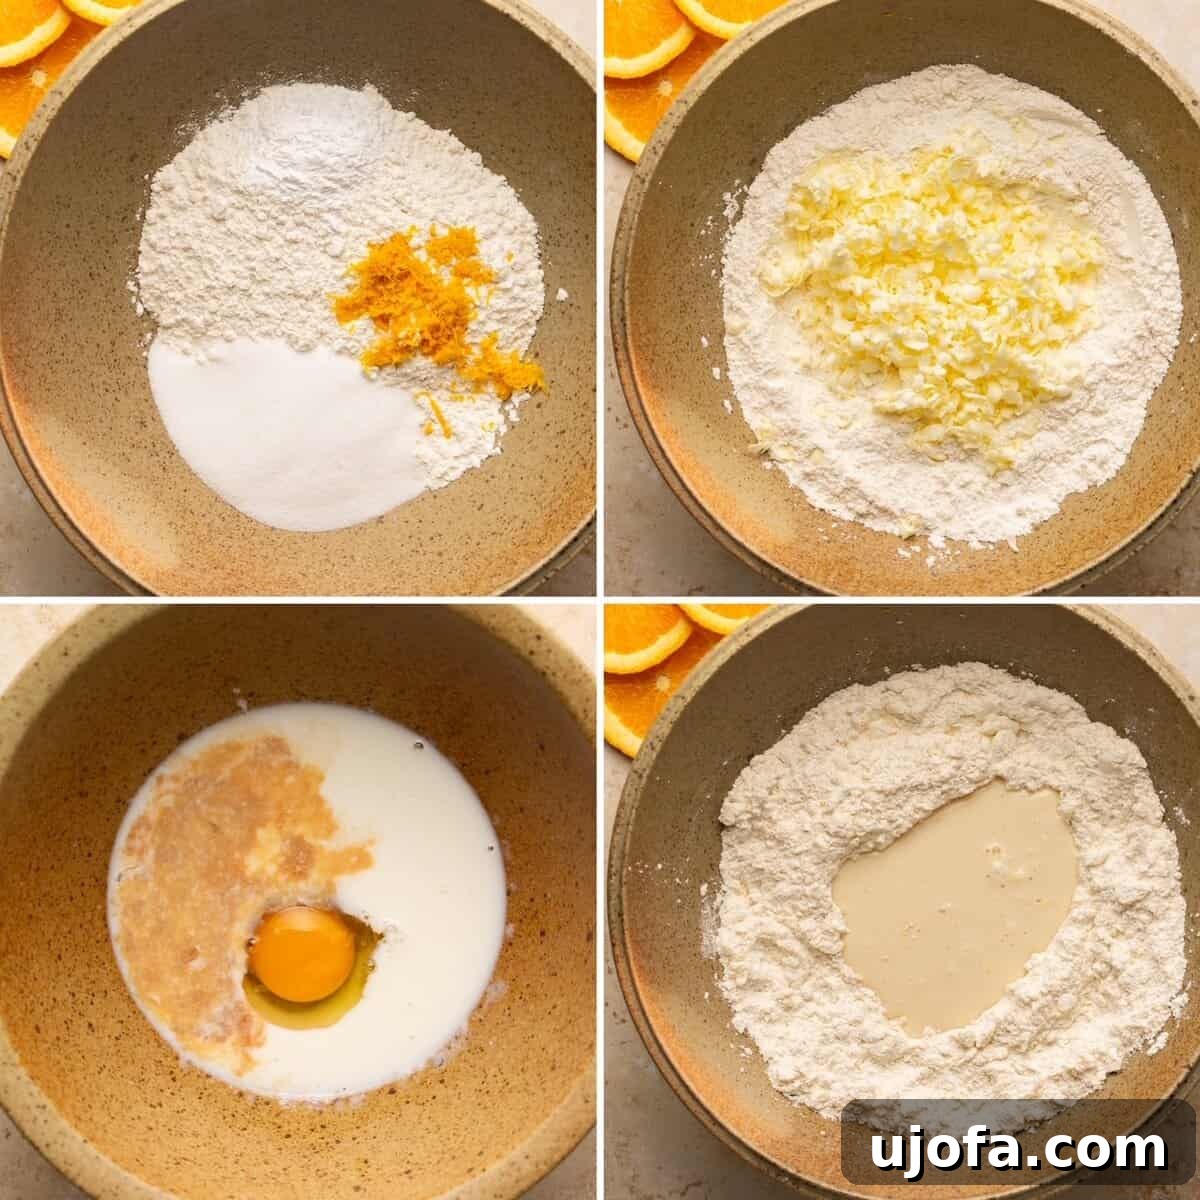
- Combine Dry Ingredients Thoroughly: In a spacious mixing bowl, meticulously whisk together the gluten-free flour blend, the ⅓ cup of granulated sugar, the gluten-free baking powder, and the aromatic orange zest. Ensure all ingredients are thoroughly combined and evenly distributed. This step is vital for consistent flavor and rise.
- Incorporate the Cold Butter for Flakiness: Using a standard box grater, grate the frozen butter directly into your dry ingredient mixture. This technique creates numerous tiny, uniform pieces of butter, which are absolutely crucial for achieving flaky scones. Gently combine the grated butter with the dry ingredients using two forks, a sturdy pastry cutter, or even your clean, cold fingertips. Work swiftly and lightly to prevent the butter from warming up. The mixture should resemble coarse crumbs with distinct pea-sized pieces of butter visible throughout.
- Prepare the “Buttermilk” and Wet Ingredients: In a separate, smaller bowl, whisk together the cold milk (or your chosen dairy-free alternative) and the lemon juice. The lemon juice will curdle the milk slightly, creating a quick, homemade “buttermilk” effect, which reacts with the baking powder to enhance leavening. Add one of the eggs and the vanilla extract to this mixture, whisking until it’s perfectly smooth and all components are well combined.
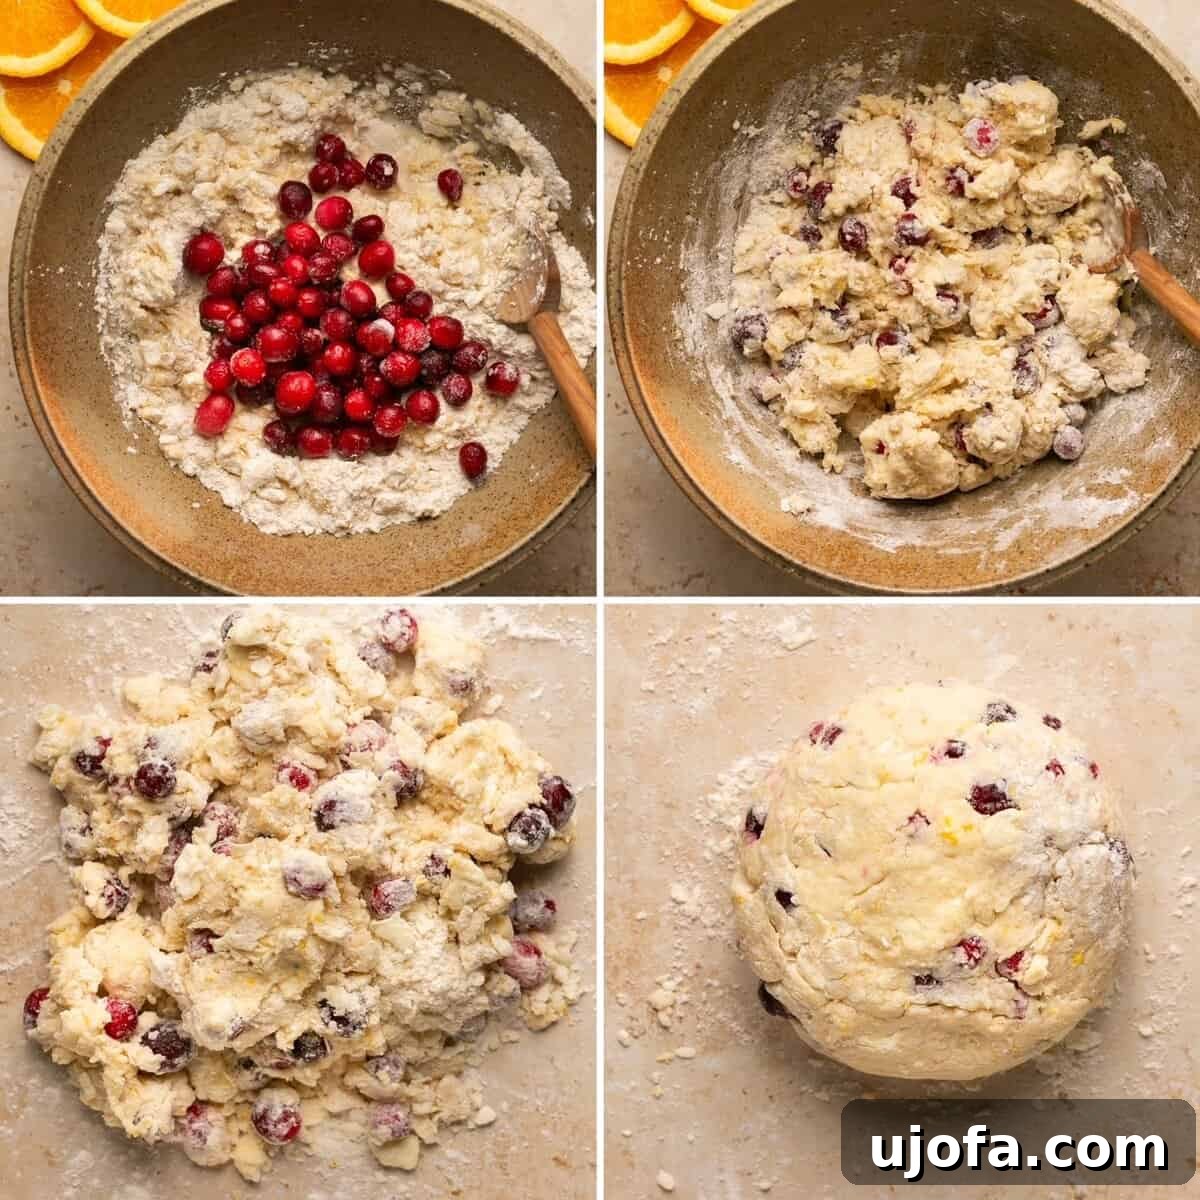
- Combine Wet and Dry, Add Cranberries: Pour the prepared wet ingredient mixture into the larger bowl containing the butter and flour mixture. At this stage, add your cranberries (whether fresh or frozen). Mix everything gently until *just combined*. It is absolutely paramount not to overmix the dough, as this can lead to tough, dense scones rather than light and flaky ones. A few dry spots in the dough are perfectly acceptable and often desired.
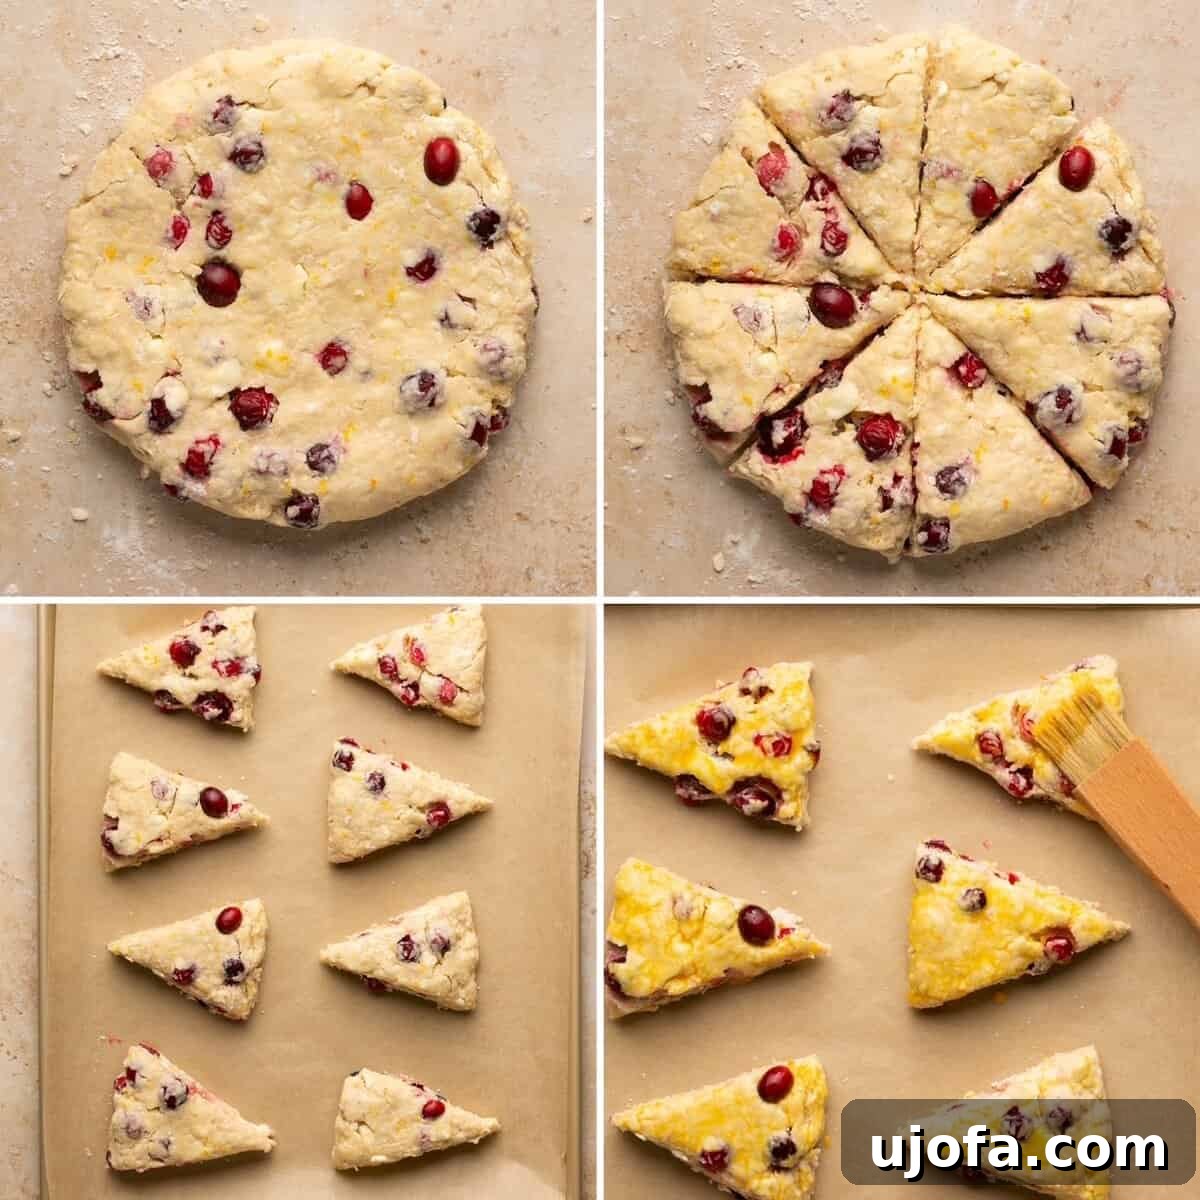
- Shape the Dough with a Gentle Touch: Lightly dust a clean countertop or a large cutting board with a small amount of gluten-free flour. Carefully transfer the scone dough onto this floured surface. Lightly flour your hands to prevent sticking. Gently work the dough into a cohesive ball, then press it down firmly and evenly into an 8-inch (20 cm) disc shape. Avoid excessive kneading or using a rolling pin, as this can activate any latent gluten-like proteins in the blend and develop toughness. If the dough appears too dry and crumbly, add milk one tablespoon at a time until the desired workable consistency is achieved. While not strictly necessary, you can place the disc in the fridge, wrapped in plastic wrap, to chill overnight for easier handling and potentially even flakier results. Using a sharp knife, carefully cut the disc into 8 equal triangle wedges.
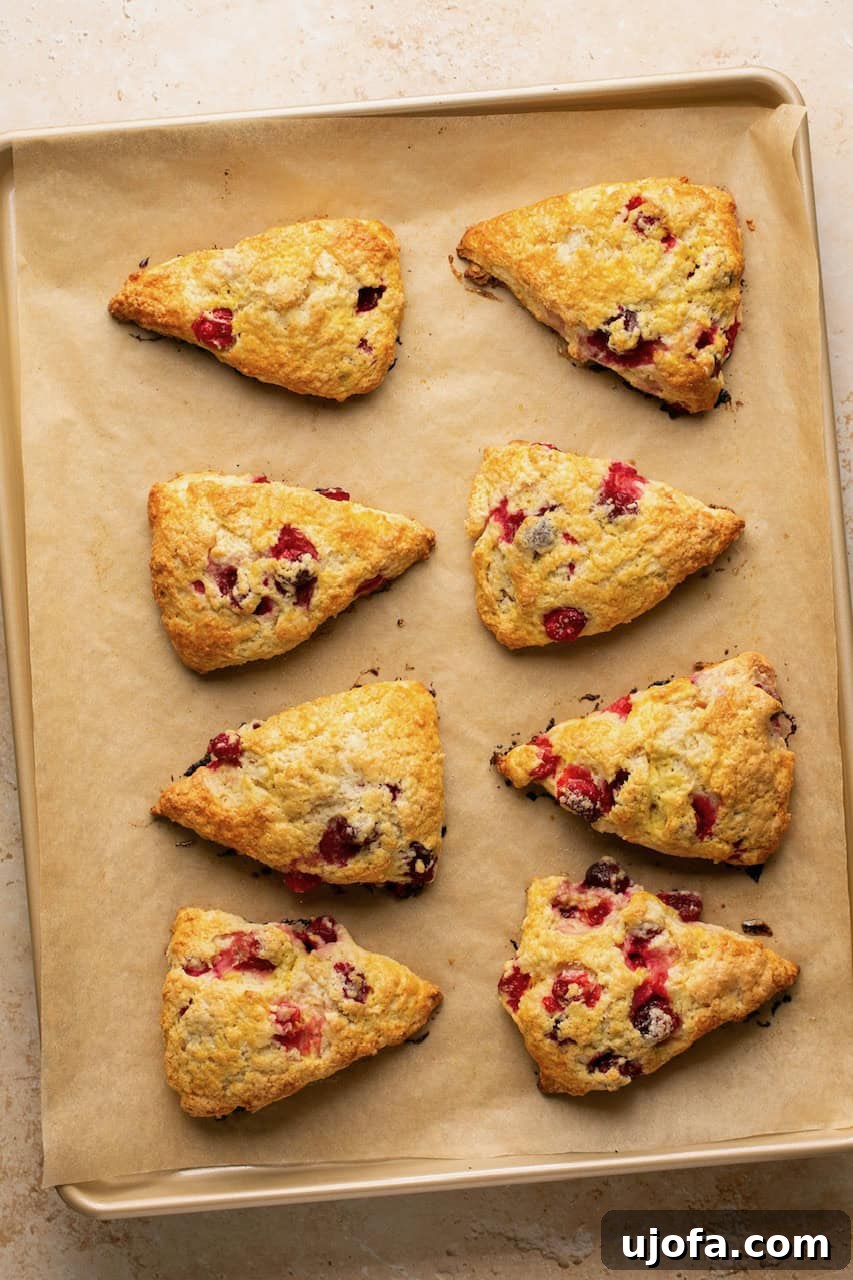
- Prepare Scones for Baking: Carefully transfer the scone wedges to your parchment-lined baking sheet, ensuring they are spaced about 2 inches (5 cm) apart to allow for proper airflow and even baking. In a small bowl, beat the remaining egg thoroughly to create an egg wash. Brush a generous layer of this egg wash over the top of each scone; this will contribute to a beautiful golden sheen and a slightly crisp crust. Finally, sprinkle each scone with a pinch of the reserved granulated sugar for an added sparkling, crunchy topping.
- Bake to Golden Perfection: Place the prepared baking sheet with the scones into your preheated 400°F (200°C) oven. Bake for approximately 20-24 minutes, or until the edges appear perfectly crispy and the tops have achieved a lovely golden-brown color. Baking times can vary by oven, so keep a close eye on them. Once baked, promptly remove the scones from the oven and allow them to cool completely on the baking sheet for at least 30 minutes before proceeding to glaze them. This crucial cooling time allows the scones to set properly and prevents the glaze from melting.
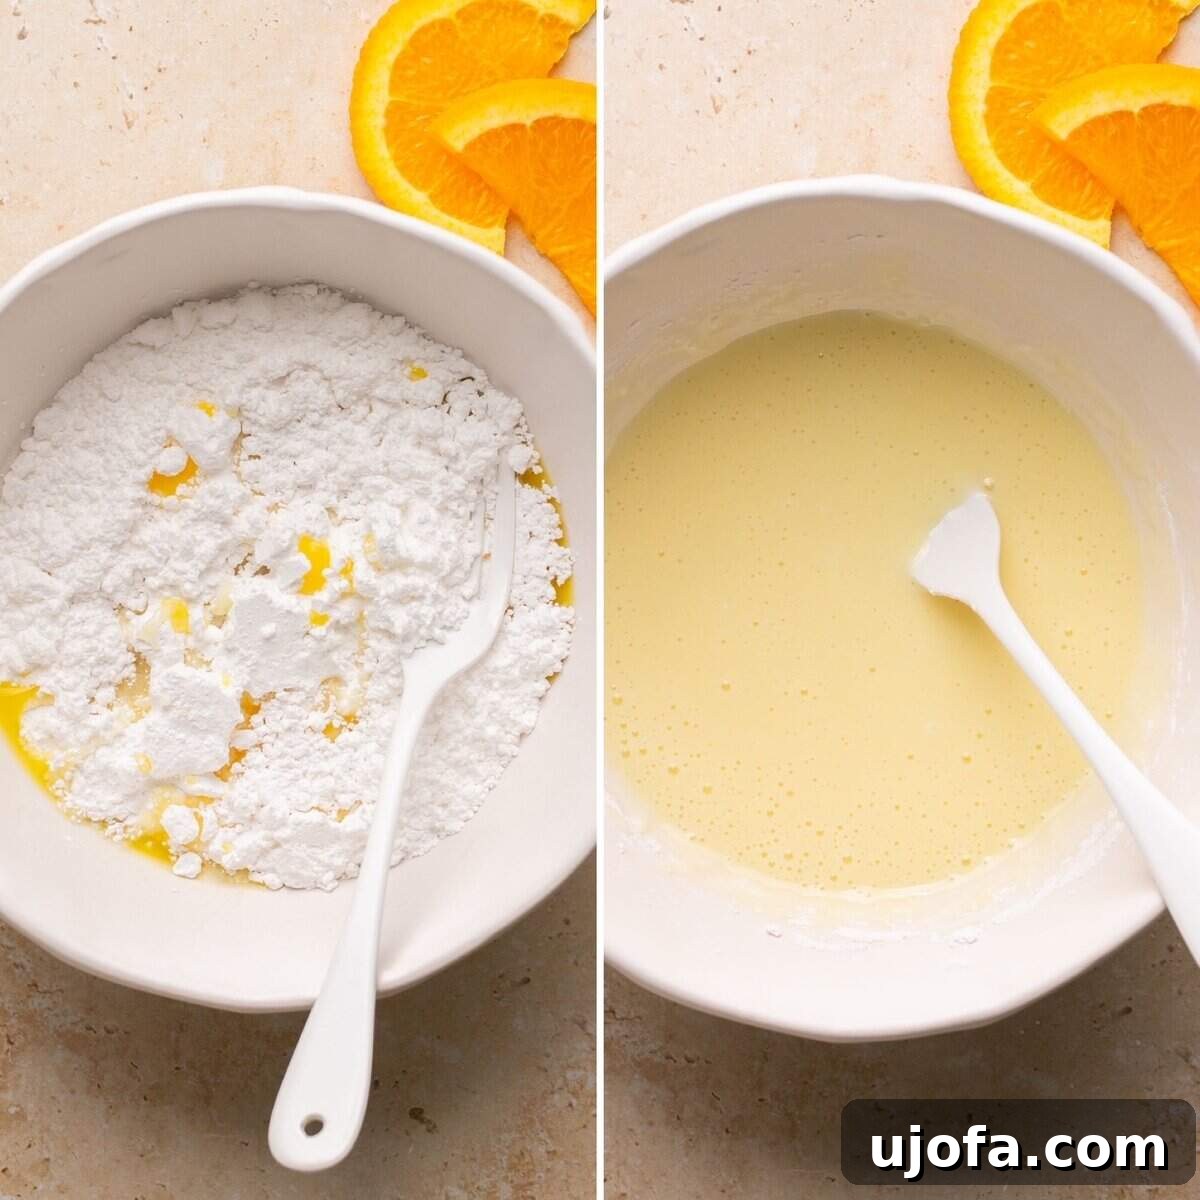
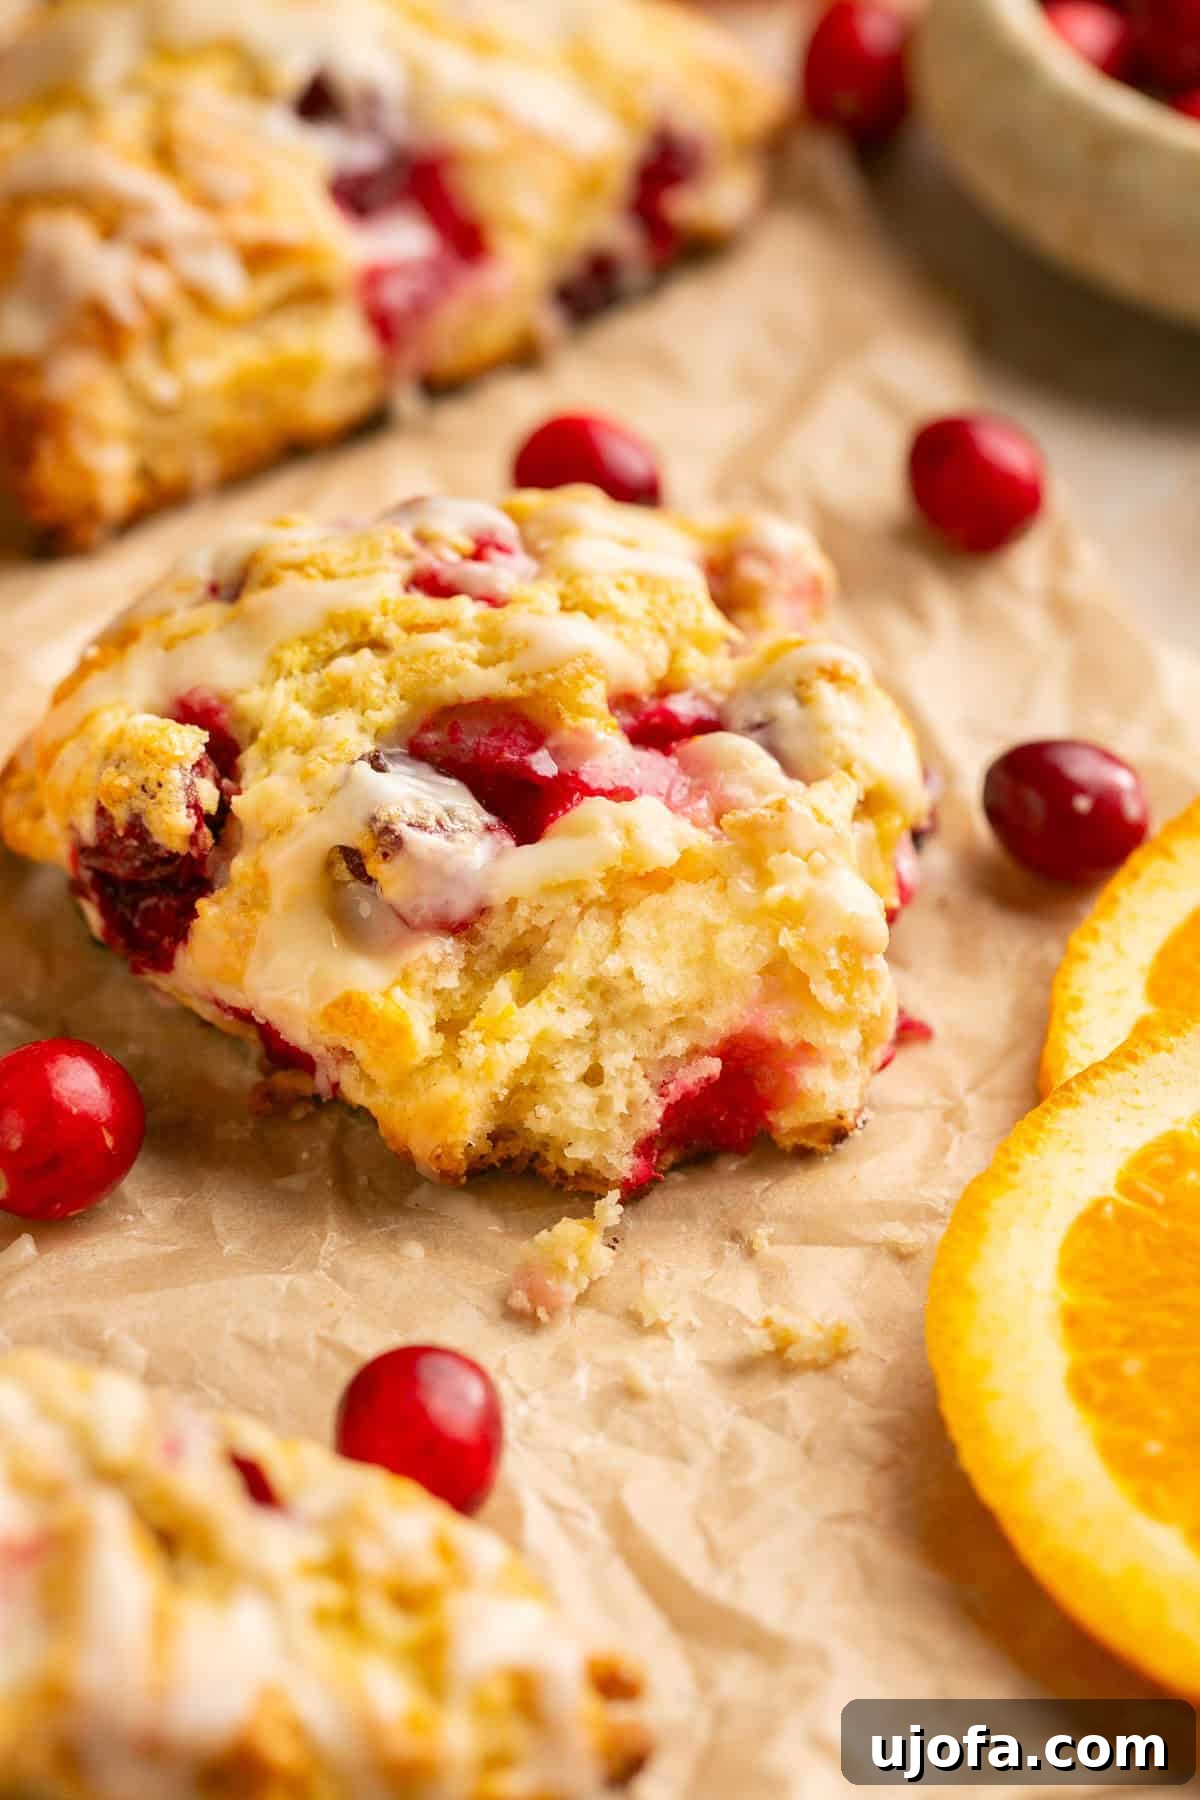
- Glaze and Serve: While the scones are cooling, prepare the vibrant orange glaze. In a small bowl, whisk together the powdered sugar and the fresh orange juice until the mixture is completely smooth and boasts a pourable consistency. Once the scones have cooled sufficiently, generously drizzle the enticing orange glaze over their tops. The glaze will beautifully set and harden as it rests, creating a delightful finish. Serve immediately and savor your homemade, wonderfully flaky, and flavorful gluten-free orange cranberry scones!
Mix-ins and Creative Substitutions for Your Scones
While the vibrant orange and tart cranberry combination is undeniably delicious and a true crowd-pleaser, this scone recipe is wonderfully versatile. Feel free to unleash your culinary creativity and experiment with a myriad of different flavors to perfectly suit your cravings, the season, or whatever ingredients you have on hand:
- Cranberry Alternatives: If cranberries aren’t your preference, or you’re simply looking for a change, feel free to swap them out. Try adding 1 cup of fresh blueberries, chopped strawberries, plump raspberries, or even rich chocolate chips for a sweeter, more indulgent treat.
- Citrus Swaps for a Zesty Twist: For a delightful lemon blueberry scone, simply substitute the orange zest with fresh lemon zest in the dough. To complete the transformation, use fresh lemon juice instead of orange juice for the glaze, creating a bright and tangy finish.
- Dried Fruits & Nuts for Added Texture: Introduce another layer of flavor and texture by incorporating ½ to 1 cup of dried currants, finely chopped dried apricots, golden raisins, or even toasted chopped nuts like crunchy pecans or earthy walnuts into the dough.
- Warm Spiced Scones: For a comforting, aromatic scone, especially perfect during the autumn and winter months, add a teaspoon of ground cinnamon, a pinch of nutmeg, or a blend of mixed spices (like apple pie spice) to the dry ingredients.
- Dairy-Free Transformation: This recipe is incredibly adaptable for dairy-free diets. Simply substitute the salted butter with your preferred high-quality vegan butter (brands like Miyoko’s or Kite Hill are excellent choices), and replace the whole milk with an equal amount of unsweetened almond milk, oat milk, or full-fat canned coconut milk.
- Savory Scones: To transform these into utterly delicious savory delights, you’ll need to make a few key adjustments. Omit the granulated sugar in the dough (you can keep a tiny pinch for a crispy top if desired), the orange zest, the cranberries, and the orange glaze entirely. Instead, fold in about ½ cup of shredded sharp cheddar cheese and 2 tablespoons of finely chopped fresh chives or other complementary herbs like thyme or rosemary. A generous sprinkle of freshly ground black pepper or even a dash of cayenne pepper can add a wonderful kick!

Mary’s Expert Tips for Scone Perfection
Achieving perfectly flaky and tender scones is a delightful culinary art, and with these tried-and-true expert tips, you’ll master it in no time, even when working with gluten-free dough!
- The Unrivaled Secret of Cold Butter: This tip cannot be emphasized enough – *always use frozen or very cold butter*. Grating the butter ensures that it’s evenly distributed in tiny pieces throughout the dough. As the scones bake, these small pockets of cold butter melt slowly, creating steam that forcefully separates the layers of dough, resulting in those coveted, irresistibly flaky layers. If your butter begins to soften or warm during preparation, don’t hesitate to pop the entire bowl of dry ingredients and butter mixture back into the freezer for 10-15 minutes to firm it up again. Using room temperature or even just refrigerated butter will yield a denser, less flaky, and generally inferior scone.
- Handle the Dough with the Lightest Touch: While gluten-free doughs don’t develop gluten in the same way traditional wheat-based doughs do, overworking them can still lead to tough and dry scones. The key is to mix until the ingredients are *just combined*; a few visible dry spots in the dough are perfectly acceptable and often indicate that you haven’t overmixed. When shaping, use a very light touch with floured hands rather than heavy kneading or aggressive use of a rolling pin.
- A Pastry Cutter is a Helpful Companion: While not strictly essential, a good pastry cutter significantly simplifies the process of incorporating cold butter into the flour mixture, helping to maintain the butter’s cold temperature. If you don’t own one, you can effectively use two forks or your clean, thoroughly chilled fingertips to achieve the desired crumbly texture.
- Never Overbake Your Scones: Overbaking is the arch-nemesis of a tender scone. Keep a vigilant eye on your scones as they bake. Look for golden-brown edges and a firm, slightly golden top. The internal temperature of a perfectly baked scone should ideally be around 200°F (93°C) if you’re using an instant-read thermometer, but visual cues are typically sufficient for experienced bakers. Dry scones are sad scones!
- Serve Fresh for Peak Experience: Scones are unequivocally at their absolute best when enjoyed fresh out of the oven, or at least within the first few hours of baking. This is when their flakiness is most pronounced and their moisture content is optimal.
- Mastering the Make-Ahead and Freezing Option: This is a fantastic time-saving tip for busy bakers. You can prepare the scone dough, shape, and cut the wedges, then place them on a parchment-lined baking sheet and freeze them for about 30 minutes until they are firm. Once firm, transfer the raw, frozen scones to an airtight freezer bag or container and store them for up to 2 months. When you’re ready to bake, simply place the frozen scones directly onto a prepared baking sheet and bake as directed, adding an additional 3-5 minutes to the total baking time. No thawing required!
Frequently Asked Questions About Baking Scones
Several common mistakes can lead to tough, dense, or crumbly scones rather than the desired soft and flaky texture. The most frequent culprits include: 1) Warm Butter: If your butter is not sufficiently cold (or even frozen), it will melt into the dough prematurely, failing to create the essential steam pockets needed for flakiness during baking. 2) Overmixing the Dough: Even with gluten-free flour, excessive handling, kneading, or mixing can overdevelop the dough, resulting in a dense and less tender crumb. 3) Overbaking: Leaving the scones in the oven for too long will inevitably dry them out, making them hard, crumbly, and unpleasant rather than wonderfully soft and moist.
Absolutely, eggs play a multi-faceted and vital role in many scone recipes, including this one. In the dough itself, an egg acts as an excellent binding agent, helping to effectively hold all the ingredients together and providing crucial structure to the scone. It also contributes significantly to the richness of the dough and results in a more tender, appealing crumb. Furthermore, the second egg is whisked and used as an egg wash, which is generously brushed over the tops of the scones before they are baked. This egg wash is instrumental in giving the scones a beautiful, deep golden-brown color and a desirable, slightly crispy exterior, enhancing both their appearance and texture. While some scone recipes opt for a milk wash, I find an egg wash provides a superior finish and richer color.
Yes, you most certainly can transform this versatile recipe into incredibly delicious gluten-free cheese scones! To do so, you’ll want to make a few straightforward adjustments. First, completely omit the granulated sugar (or significantly reduce it to just a tiny pinch if you prefer a very subtle hint of sweetness), the orange zest, the cranberries, and the orange glaze. Instead, into your dry ingredients, gently fold in about ½ cup of finely shredded sharp cheddar cheese. For an extra layer of savory depth and freshness, consider adding 2-3 tablespoons of chopped fresh chives or thinly sliced green onions. A generous sprinkle of black pepper or a tiny dash of cayenne can also elevate the flavor profile. Serve these savory scones warm with a spread of butter or a dollop of your favorite chutney for a truly delightful treat.
Yes, preparing scone dough in advance is an excellent time-saving strategy! After you’ve shaped and cut your scone wedges, you have a couple of options. You can place them on a parchment-lined baking sheet and refrigerate them for up to 24 hours. Alternatively, for longer storage, you can freeze the cut scones on a baking sheet until they are solid (this usually takes about 30 minutes to an hour), then transfer them to an airtight freezer bag or container for up to 2 months. When you’re ready to bake, simply place the chilled or frozen scones directly onto a prepared baking sheet and bake as directed in the recipe. For frozen scones, you’ll typically need to add an extra 3-5 minutes to the total baking time.
To revive leftover scones and bring them back to their tender, fresh-baked glory, the best method is usually gentle oven reheating. Preheat your oven to a low temperature, around 300°F (150°C). Place the scones directly on a clean baking sheet and warm them for approximately 5-10 minutes, or until they are heated through to the center. It’s important to be careful not to overheat them, as this can quickly dry them out. A toaster oven can also work well for individual scones. Microwaving is generally not recommended for scones, as it tends to make them soft, chewy, and can quickly compromise their lovely flaky texture.

Serving Suggestions for Your Homemade Scones
These glorious gluten-free orange cranberry scones are undeniably delightful on their own, offering a perfect balance of sweetness and tang. However, they truly ascend to new heights when thoughtfully paired with a few complementary accompaniments. For the ultimate indulgent experience, serve them warm alongside a steaming cup of freshly brewed coffee, a soothing herbal tea, or even a refreshing glass of cold milk (whether dairy or your preferred non-dairy alternative). To truly elevate your scone experience, consider adding a generous dollop of rich clotted cream, a smear of homemade strawberry or apricot jam for extra fruitiness, or even a vibrant and tangy lemon curd. Their festive and bright flavor profile also makes them an impeccable addition to any elaborate brunch spread, a sophisticated afternoon tea party, or simply as a comforting and elegant dessert after a light meal.
More Delicious Gluten-Free & Dairy-Free Dessert Recipes
If you’ve thoroughly enjoyed baking and savoring these gluten-free orange cranberry scones and are eager to explore more delightful treats that cater to specific dietary needs, we invite you to discover some of our other popular and equally delicious recipes:
- Quick & Easy Chocolate Chip Mug Cake
- Wholesome Pumpkin Banana Muffins
- Crispy Gluten-Free Gingersnaps
- Simple Gluten-Free Pecan Pie
- Hearty & Healthy Apple Crumble
Easy Gluten-Free Scones Recipe (Dairy-Free Option)
This easy gluten-free scones recipe with orange and cranberries is the perfect cozy treat. They are flaky, slightly sweet, and delicious with a cup of coffee. Easily made dairy free!
Author: Mary Smith
Rating: 5 out of 5 stars (based on 8 votes)
Prep Time: 15 mins
Cook Time: 24 mins
Total Time: 1 hr 9 mins
Yield: 8 scones
Pin this Recipe
Equipment
- Large mixing bowls
- Box grater
- Whisk
- Pastry cutter (optional, but helpful for incorporating butter)
- Sharp knife
- Baking sheet
- Parchment paper
Ingredients
For the Scones:
- 2 cups King Arthur Baking Measure for Measure flour (or another reliable gluten-free 1-to-1 blend)
- ⅓ cup granulated sugar (+ 1 tbsp for dusting)
- 2 tsp gluten-free baking powder
- 1 tbsp orange zest (from about 1 orange)
- ½ cup salted butter, frozen or very cold (use high-quality vegan butter for dairy-free)
- ½ cup whole milk (sub unsweetened almond milk or full-fat canned coconut milk for dairy-free)
- 1 tsp lemon juice
- 2 eggs, large (divided: one for dough, one for egg wash)
- 1 tsp vanilla extract
- 1 cup cranberries (frozen or fresh)
For the Orange Glaze:
- 1 cup organic powdered sugar
- 2.5 tbsp fresh orange juice
Instructions
- Preheat oven to 400°F (200°C). Line a baking sheet with parchment paper.
- In a large bowl, whisk together the gluten-free flour, ⅓ cup granulated sugar, baking powder, and orange zest until well combined.
- Grate the frozen butter directly into the flour mixture. Using 2 forks or a pastry cutter, combine until the mixture is crumbly with pea-sized butter pieces. Work quickly to keep the butter cold.
- In a separate bowl, whisk together the milk and lemon juice. Add one of the eggs and the vanilla extract, whisking until smooth.
- Pour the wet ingredients into the butter/flour mixture. Add the cranberries. Mix gently until just combined; do not overmix.
- Transfer the dough to a lightly floured countertop. With lightly floured hands, gently form the dough into a ball, then press it down into an 8-inch (20 cm) disc. Cut into 8 triangle wedges with a sharp knife.
- Place the scones 2 inches apart on the prepared baking sheet. Beat the remaining egg for an egg wash and brush it over each scone. Sprinkle each scone with the reserved 1 tablespoon of granulated sugar.
- Bake for 20-24 minutes, or until edges are crispy and tops are golden brown. Remove from oven and let cool for 30 minutes.
- For the glaze, whisk powdered sugar and fresh orange juice until smooth. Drizzle over cooled scones. The glaze will harden as it sets. Enjoy!
Recipe Notes & Tips
- Mix-ins & Variations: Customize by swapping cranberries for blueberries, strawberries, chocolate chips, or even nuts. Replace orange zest/juice with lemon for a lemon blueberry variation.
- Dairy-Free Option: Ensure you use a high-quality vegan butter and an unsweetened non-dairy milk (like almond or coconut milk) to replace their dairy counterparts.
- Cold Butter is Crucial: Always use very cold or frozen, grated butter to achieve the flakiest scones. This prevents the butter from melting too early, creating steam that separates the layers.
- Gentle Handling of Dough: Avoid overmixing or excessive kneading, as this can lead to tough and dense scones. Mix just until combined.
- Storage: Store any leftover scones in an airtight container at room temperature for up to 3 days to maintain freshness.
- Freezing: Baked and completely cooled scones can be stored in an airtight freezer bag for up to 2 months. Thaw at room temperature or reheat gently in a preheated oven.
- Make Ahead: You can cut the scone wedges and freeze them (unbaked) on a baking sheet until solid, then transfer to a freezer bag. Bake from frozen, adding a few extra minutes to the baking time.
Nutrition Information (Estimated per scone)
Serving: 1 scone
Calories: 328 kcal
Carbohydrates: 48g
Protein: 5g
Fat: 14g
Saturated Fat: 8g
Polyunsaturated Fat: 1g
Monounsaturated Fat: 4g
Trans Fat: 0.5g
Cholesterol: 73mg
Sodium: 219mg
Potassium: 66mg
Fiber: 4g
Sugar: 26g
Vitamin A: 460 IU
Vitamin C: 6mg
Calcium: 110mg
Iron: 1mg
All nutrition facts are estimates and automatically calculated. While efforts are made to ensure accuracy using tools like MyFitnessPal, please note that they may not always be 100% precise and can vary significantly based on specific brands and ingredients used. For the most accurate grams per serving size, it is recommended to weigh your total yield after baking and divide by the number of servings.
Did you make this recipe? We’d love to see it! Share your creation and tag us on Instagram @maryswholelife!